Sunday, October 28, 2018

Spooky Science - STEAM Program


Spooky Science, STEM programs for kids, STEAM programs for kids

This is my second STEAM program with my new job (the first was a repeat of my "Mirror, Mirror" program), and since it was going to be close to Halloween I immediately thought of playing with dry ice to make creepy fog, a bubbling cauldron, and ghostly bubbles for a "Spooky Science" theme. 

Since the audience has tended to be on the younger end of the intended age range of 5-10, I decided it would be best to do the dry ice experiments as demonstrations rather than hands on, and a friend (thanks, Rebecca!) made the suggestion of making a clear slime "ectoplasm" a la Ghostbusters for a hands-on activity. I played around with it and then discovered I could buy glow powder on Amazon, and decided to go one step better and make Glow-in-the-Dark slime! 

Budget: $70 total (but that was enough for at least 36 participants)
Ages: 5-10+
Time: 1 hour
Number: I had 12 kids, would not recommend for more than 20 unless you have more than one staff person to run it.

Dry Ice Experiments:

  • dry ice, 5-10 lbs ($15-$30, I was lucky enough to have it donated)
  • water, both hot & cold
  • assorted bowls
  • tall, clear container (could be a jug, vase, whatever)
  • rubber gloves or balloons
  • Dawn dish soap
  • long strip fabric (about 4-6" longer than the diameter of your widest bowl
  • paper towels

1. Bubbling Cauldron & Creepy Fog - To set the mood, I started off by having a
Spooky Science, STEM programs, STEAM programs, dry ice experiments with kids
bubbling cauldron going as they came in the room by putting about 2 cups of dry ice into a large plastic cauldron and adding hot water. This will initially produce a mass of rolling fog, then it will settle down into a steady "simmer". [Click on any photo to see full-size image.]

After everyone was settled, we talked about what was going on, what dry ice is (frozen carbon dioxide, -110 F or -79 C), and sublimation. Then I poured in more hot water to set off another mass of rolling fog, and let them come up in groups of 3 to put their hand into the fog in the cauldron. I also got some of the water out and let them feel how it was now cold, even though it was hot when I put in.
Spooky Science, STEAM programs, STEM programs, dry ice experiments for kids
2. Cold "Boiling" Water - I filled a tall-ish, clear container with cold water and added just a few pellets of dry ice. The audience could see the bubbles of CO2 gas form on the pellets (which sink rather than float like wet ice) and float to the top. Though the water appears to be boiling, it really isn't, and kids could touch the water to confirm it is cold.
Spooky Science, inflating glove with dry ice, STEM/STEAM programs for kids
3. Self-Inflating Glove - Next, I put 2-3 pellets of dry ice into a latex glove (because I had no balloons), and we watched it inflate (takes about 20 minutes at room temperature, but you can speed this up by putting it in hot water).

4. Screaming Ice - Then I made the dry ice "scream" by picking it up with metal tongs, then by putting some in a metal bowl. The noise is caused by the evaporation of the dry ice when it contacts the warmer metal and producing a high-pitched vibration that sounds like a screech or squeal. It only lasts a couple of seconds and isn't very loud so I made sure everyone was quiet and listening first.

5. Giant Ghost Bubble - I first made a soapy solution (I didn't measure this, but I'd guess about 1/4 C Dawn dishwashing soap to 1 C water), then got a large glass bowl and put about 2 cups of dry ice pellets in, and added hot water. Then I dipped a fabric strip in the soap solution and lightly ran my fingers down it to remove the excess (saturated but not dripping). I held the strip taught and ran it across the top edge of the bowl to create a soap film, then we watched the giant bubble grow! It eventually burst, releasing a ghostly fog!


You can repeat as long as soap does not end up dripping or running down into the bowl. If it does, smaller bubble will form and grow within the bowl that will prevent you from being able to make a large bubble. Let it bubble for a while, then you can pour off the water, rinse the dry ice lump a couple of times, then add more hot water and try again.

Ectoplasm (Glow-In-The-Dark Slime):

  • Elmer's Clear Glue* (2 ounces per participant), $20-25 for a gallon jug
  • Borax powder, $6 (see my previous post regarding safety)
  • warm water
  • small (6-10 oz) water bottles
  • Glow Powder*, natural green (brightest glow), $8/30g, (I got 60 g and had lots left)
  • food coloring
  • glitter 
  • small paper bowls
  • craft sticks
  • tablespoon measuring spoons, 1/4 cup measuring cups
  • small plastic cups
  • gloves (not required, but available for those who might want them)
  • zip-lock bags

1. Set Up - I made the Borax solution up ahead of time, as it is inhalation/ingestion of the powder that is the safety risk. I added 1/2 teaspoon Borax powder per cup of warm water, which is about a 0.88% solution, and stirred until dissolved (allow for 1/4 Cup solution per participant). I then dispensed the solution into small water bottles (1 for every 3 participants) and labeled clearly with a Sharpie. (I did not have empty bottles, so I used the water from the bottles to make the solution so as not to waste it).

I set out a bowl, a cup, and a craft stick (for stirring) at each place. Then I set out 1 bottle of water, 1 bottle of labeled Borax solution, and 1 set of measuring utensils for every 3 participants. Since I had 1 big jug of glue, I measured and dispensed it into their bowls; if you use smaller bottles you can let the kids do it themselves, reminding them to use the craft stick to scrape it all out.

2. I instructed participants that it was very important that they listen and follow directions and not do anything until I told them to if they wanted theirs to turn out right. First, they were to measure out 2 tablespoons of water into the cup, then add it to the glue in their bowl.

3. Then they added 1 drop of desired coloring, and glitter of their choice. I cautioned them that it was very important not to add too much coloring or glitter, and they would see why later [the less color & glitter the better for a brighter glow]. 

4. I then added 1/4 teaspoon of the "secret ingredient" (glow powder) to each one, and gave them a few minutes to get all their additions mixed well, using the craft stick. [I never told them we were making glow-in-the-dark slime, so they would be surprised and amazed.]

5. Before the final step, I instructed them to measure out 3 tablespoons of the Borax solution *into the plastic cup* and wait for the next step. When everyone was ready, I instructed them to start stirring their mixture, and while stirring to gradually pour some of the pre-measured Borax solution into the mixture, but not to use all of it yet.

6. Then we spent a few minutes mixing, and I went around checking their slime and letting them know if they needed to add a little more Borax. Some needed it all, and some didn't, probably due to variations in measurements, and stirring. Some had to work theirs a little bit to get it to all come together into a ball.

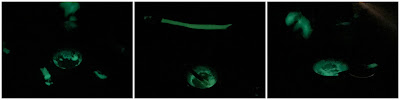
7. Once everyone's slime was to a satisfactory consistency and they were playing with it, I told them now we're going to see what the secret ingredient was for, and turned the lights out. They were suitably impressed, as you can hear from the "oohs" and "aahs" in the video below (be sure volume is turned up). Unfortunately, the glowing slime didn't show up very well in the video after it was uploaded, but you can see it better in the pictures further down.


8. I explained what the glow powder was (strontium aluminate) and that it works by storing energy from the UV rays in the light, then slowly releasing it, producing the glow, a type of solar energy. When it stops glowing, it just has to be recharged by putting under a bright light or in sunlight (I had pre-charged the powder by leaving it in the sunlight for an hour, and shining a UV flashlight on it for a few minutes before using it.). It can be used and recharged indefinitely, but the slime itself will start to break down after maybe 3-4 weeks. 

In the photos below, not only is the slime glowing as the kids play with it, the mixing bowls and stir sticks are also glowing from the residue left on them.


Glow-In-The-Dark Slime, Spooky Science, STEM/STEAM programs for kids

9. I gave them all ziplock bags so they could take their slime home, and then we played with the dry ice a little more for the last few minutes.

[*Note - Elmer's now makes glow-in-the-dark glue you could also use, but it was not readily available in larger quantities at a reasonable price when I first planned this program. Now it can be purchased in 9 oz bottles for about $9 at Wal-Mart. It works fine, but is much more opaque. It is very thick, so you may need to add another tablespoon of water to thin it down some. Also, the "natural" will glow much brighter than the colors. My method is more economical for large groups, or multiple programs.]


Spooky Science, STEM/STEAM programs for kids

How It Went

Overall, it went very well. One of the dry ice experiments I had planned did not work (concentrating the CO2 gas by forcing through a funnel and into a length of tubing to blow soap bubbles filled with fog), but I was skeptical of it to begin with. But the kids were plenty impressed by the rolling fog and giant bubble we made in the bowl, so it was fine. The massive amounts of fog produced when the hot water hits the dry ice always impresses everyone!

Everyone's slime came together pretty well, though for some reason it was stiffer than when I had made it at home, more putty-like. At home I produced a perfect batch that was really stretchy and truly slimy without being too sticky. But the kids were perfectly happy with it, and of course were amazed when they discovered it glowed in the dark!

We did run into one issue, though. About half of the kids chose to make theirs green, as I had, since that is the color of the ectoplasm left by Slimer in the Ghostbusters movies, but a couple chose yellow, one made blue, and two chose red. We discovered that the red coloring masked the glow, so that it only faintly glowed white instead of bright green.

Also, even with limiting the food coloring to 1 drop, the color was way too saturated, so next time I would add a squirt of Elmer's glitter glue, which has coloring and glitter added, to give just the right amount of more subtle color to make it more clear and slime-like. But I think the kids were all happy with their slime and everyone seemed to have a great time.

Sunday, October 21, 2018

Family Storytime - Pumpkins!


While I did holiday storytimes in my previous outreach position, the branch I am at now doesn't do holiday themes for regular weekly storytimes, but only as separate programs. At first I was going to do "Monsters" or a generally "Spooky" storytime without any mention of Halloween, but I've done those before and wanted to do something new. I thought a general "Pumpkin" theme would be more appropriate for my crowd that typically skews younger.

pumpkin storytimeWe started with our welcome song and introductions, then I introduced the topic with a really nice non-fiction book, Seed, Sprout, Pumpkin Pie by Jill Esbaum. (I didn't read it word-for-word, but paraphrased and skipped around a little as it is a bit long.)

This National Geographic book tells it all, showing all stages of growth including seed, sprout, vine, flowering, pollination, immature green pumpkin and mature pumpkin. It explains that pumpkins are a type of squash and shows lots of different varieties and colors of both, and various uses. The photographs are clear, bold, and colorful.


Pumpkin storytime
We followed that with our story song and then read a great book for the younger kids in the crowd, Duck & Goose Find a Pumpkin by Tad Hills. Duck and Goose want to find a nice pumpkin like their friend Thistle has, but are a bit misguided in their search, looking in a hollow log, in an apple tree, and in the pond. Finally Thistle clues them in about the pumpkin patch. 

Short, simple text and easily understood humor, plus a lovely fall color palette in the illustrations. This was the only one I could find that didn't show jack-o'lanterns or mention Halloween.

We followed that with everyone's favorite pumpkin fingerplay, then repeated it using the non-dominant hand:


Five Little Pumpkins

Five little pumpkins, sitting on a gate.
(hold up 5 fingers)
The first one said, "Oh my, it's getting late!"
(hold up 1 finger, point to wrist)
The second one said, "There are bats in the air."
(hold up 2 fingers, flap arms)
The third one said, "But we don't care!"
(hold up 3 fingers, shake head)
The fourth one said, "Let's run and run and run!"
(hold up 4 fingers, run in place)
The fifth one said, "I'm ready to have some fun!"
(hold up 5 fingers)

Then WHOOOOSH went the wind, 
(make wind sounds)
And OUT went the light.
(clap hands together loudly)
And five little pumpkins rolled out of sight!
(hold up 5 fingers, roll arms)

Pumpkin StorytimeOur second story, The Plumply, Dumply Pumpkin by Mary Serfoza and Valeria Patrone, was a bit of a tongue-twister and also showed someone selecting a pumpkin. Peter Tiger is looking for just the right pumpkin. Not too short, not too tall, not lopsided or bumpy. What is Peter going to do with his perfect pumpkin?

Short, simple text and bold illustrations make this perfect for the younger kids. The audience can guess what he's going to do with his pumpkin, and comment on the various possibilities presented.

We followed that with a song that also talks about various sizes and shapes of pumpkins:

Have You Ever Seen a Pumpkin?
(to the tune of "Have You Ever Seen a Lassie?")

Have you ever seen a pumpkin, a pumpkin, a pumpkin?
(show pumpkin)

Have you ever seen a pumpkin that grows on a vine?
(show pumpkin, twirl finger like vine)

Short ones and tall ones and big ones and small ones.
(hold hand down low, up higher, hold arms in big circle, hands in small circle)

Have you ever seen a pumpkin that grows on a vine?
(show pumpkin, twirl finger like vine)

Five Little Pumpkins, pumpkin storytime

I added a second verse using the printable pumpkin faces above that I got from Sunflower Storytime, and cut out, laminated, and glued on craft sticks. First we went through the faces and identified what emotion they showed, and upon singing the second verse, we substituted feelings for sizes in the 3rd line, with me holding up the corresponding face.

Pumpkin storytime
Our third and final story was Little Boo by Stephen Wunderli, which is the story of a little pumpkin seed who really wants to scare everyone, but he's so little and cute, no one is afraid. The wind tells him to be patient and wait, and someday he will be able to scare. 

Kids can relate to being too small/young to do what they want, and being impatient to grow up. They will have fun saying "Boo!" along with the story, and Tim Zeltner's folkart illustrations are absolutely wonderful. Who knew a pumpkin seed could be so adorable?

We finished things up with a closing song, and I put out materials and instructions for making a 3D pumpkin out of paper strips for those who wanted to do a craft.

Pumpkin craft, pumpkin storytime

This required very little prep, just cutting strips of orange paper and squares of brown and green paper with the paper cutter. You could punch holes in the middle and ends of each strip and use brad fasteners, but we didn't have any so I used used glue sticks. For this one, the strips were each 12"x1" and the final pumpkin was about the size of a softball. For a larger one, use longer strips and more strips. The stems and leaves were cut free-hand, and after it was completely dry, most of the base can be cut away, leaving a small circle at the bottom for a little weight and stability.

*If you have the fasteners instead of glue, this makes an excellent no-mess drop-in DIY craft for passive programming or as part of a larger fall/Halloween program.

How It Went

I haven't quite hit my stride with this storytime. This is only my second time, and doing it only once a month without a consistent audience makes it more difficult. I never know how many or what ages to expect, and I don't feel quite as connected with the audience as I did with some of my outreach storytimes where I really got to know the kids. I still feel just a little awkward as it's so different from my previous outreach storytimes in a classroom with 4 year-olds, but it's just a matter of time. I remember initially feeling disconnected when I first started my previous job, too.

I started out with a fairly good number, but lost a few early on, while presenting the non-fiction book in the introduction. While this always worked well in the past, I can see it won't work here and I'll need to do more songs and simple books, and go much easier on the non-fiction. As good as the book was, it just didn't engage the younger ones. I also think I'm running into some cultural differences in expectations with my diverse audience. 

But the ones who stuck it out seemed to really enjoy it, and most of the parents did participate, though I had to encourage the audience to move a little closer and sit in front of me. I think the Duck & Goose book was probably their favorite; they loved laughing at all the silly places they looked for a pumpkin, especially the apple tree! They all knew you got apples from an apple tree and went to the pumpkin patch for pumpkins. We also talked about all the foods you can make with pumpkin, like pie, bread, muffins, and soup; though when I mentioned pumpkin ravioli I heard someone say "yuck".😆

The ones who chose to do the craft really seemed to like it; I just left the supplies out and let whoever wanted to make one do so until everything was used up.

Wednesday, October 3, 2018

Programming - How Much Prep Is Too Much?

Are We Depriving Participants of the Chance to Practice Developmentally Appropriate Skills?

This is a subject I've thought about off and on over the years, but something I have been really struggling with lately in my own program planning. 

We all want our programs to go smoothly, and we all know that the best way to ensure that is with plenty of planning and preparation. We scour Pinterest, blogs, Facebook groups, and more looking for ideas. We test things out in advance to see if it really works, how long it takes, what steps might be troublesome. We buy supplies and prepare things in advance to save time and make things easier.

I've seen many arts and crafts programs where participants are given a bunch of pre-cut things, and they just have to glue them on a piece of paper. Sometimes participants were handed pre-assembled little "kits" in zip-lock bags so they not only didn't have to cut anything out, but didn't have to think about what pieces they needed and how many of each and count them out. Cooking and STEM programs involve mixing things together with an expected and observable result, and often all the ingredients are pre-measured into little cups so all participants have to do is combine them. I've taken these time-saving steps myself; I'm sure most of us have at some time or another.

There is no question all the advanced prep saves time, frustration, minimizes the mess, and leads to a better finished product or expected outcome. But is it really what we should be doing? To answer that, we must first really think about and clarify what our goals and purpose are for said program. What do we want participants to gain from the program? Is it about the product, or the process?? Are we depriving them of opportunities to practice developmentally-appropriate skills and gain confidence and independence? I just can't stop thinking about a meme I saw last week, which said:
"Draw it for me...Cut it for me...Paste it for me...Put it together for me. 
All I learn is that you do it better than me."
I know some people really want the kids to have something cute to take home, but that is not as important to me. I'm more interested in them learning or experiencing something, and though I like it when that also results in creating something they can take home, I don't feel like that is a requirement. Kindergarten teachers are reporting that kids are starting school with more poorly developed fine motor skills in general than in the past, and more specifically, they don't know how to use scissors. Kids really need to practice scissor skills, and anything else that uses their hands. They need to cut, twist, squeeze, and smash things; they need to pick up and manipulate small things. The more we can let them do these things in library programs, while educating their caregivers on why they need to do them, the better!

All this is certainly not meant to criticize how anyone conducts their programs, but should be taken as me "thinking out loud" as I'm figuring out how to handle my next STEAM program, as well as storytime crafts. If you've read many of my storytime planning posts, you know I'm all about finding your own style, trying new things, and avoiding absolute thinking (as in  "everybody should do this", "no one should ever do that", "I have to do this"...). So sometimes it might be more about the final product, and that's okay (sometimes). Sometimes there are good reasons not to have participants measure every single ingredient or cut out every piece on their own. So we can compromise; have some things pre-measured/cut/whatever, but let the kids do some on their own, too.

And this brings me to my current dilemma. I'm planning a "Spooky Science" program for later this month, and I'm trying to figure out exactly how I want to handle the measuring of ingredients, and what supplies I need in regard to that. I know it's easier to pre-measure everything and dispense it, and that also leads to more consistent results, but the science teacher in me is screaming that (1) measurement is a critical skill in science, so they need to learn it, and (2) if it doesn't turn out right, that just creates an excellent opportunity for critical thinking and problem solving as they try to figure out why. I'm still not sure *exactly* how I'm going to handle it, but I will definitely have the kids measuring at least some of the ingredients themselves.

I've been think a lot about how important an understanding of child development is for working in youth services lately, so it might be a recurring theme in future posts.