Wednesday, August 14, 2019

Kitchen Chemistry - STEM Program


kitchen chemistry, edible experiments

I thought it would be fun to end the summer with a kitchen chemistry program featuring edible experiments, namely making ice cream in a bag. This is a really cool activity that I have written up on the blog before ("Ice Cream In A Bag STEAM Program") as an idea, but this would be the first time that I had actually done it with a group of kids.

I decided to pair it with making butter, though it is a completely different scientific process at work, since both are dairy and both require shaking, which I thought we could have a little fun with by having a playlist featuring songs with "shake" in the lyrics.

Time: 1 hour
Ages: 5-10
Number: 24
Budget: $55 (if you have to purchase everything)

Materials:
  • 3 pints heavy cream
  • 24 small containers (I purchased cheap, disposable 1/2 C storage containers)
  • plastic knives
  • gluten-free crackers
  • 1 gallon half & half (can also use whole milk, but will be less creamy)
  • 1 quart non-dairy milk (be sure it is unsweetened and unflavored; I used almond milk)
  • sugar, about 2 Cups total
  • vanilla, 1 oz
  • ice, two 22 lb bags
  • salt, 8 Cups (I used 1 large box kosher salt)
  • 48 pint ziplock bags* (I recommend double bagging)
  • 24 gallon ziplock freezer bags
  • spoons
  • measuring cups & spoons
  • thermometer
Activity #1 - Making Butter

1. We first discussed how butter is made from cream, and the cream is the part of the milk that contains most of the milk fats. The fats are suspended in tiny particles in the solution, but when cream is churned the particles are knocked into each other and stick together, gradually forming larger and larger globs until you end up with one big ball of butter.

2. I gave each child one of the small containers, then poured heavy cream into each one, just about half-full. I instructed them to put the lids on, and asked the adults to please double-check that they were completely sealed. 

3. I explained that they would have to shake that container very hard for about 20 minutes, and that first they would hear/feel it sloshing around, then it would form a thick foam of whipped cream that would not feel sloshy, but to keep going after that and eventually the butter would separate from the liquid, leaving a big ball of butter rolling around in the liquid.

4. Then we began shaking! To make it a little more fun, I put together this playlist to go along with the shaking:


5. I went around encouraging them to shake harder, and let their grown-ups help out a little if their arms got tired, showing them how hard you have to shake, and checking theirs to let them know if it was done, or how close they were. Many wanted to stop at the whipped cream stage, and had to be urged to keep going (hint: at that stage vigorous stirring can also push it to the separation phase).


6. After a lot of shaking the butterfat had finally congealed into a fairly solid ball for everyone, and I showed them how to decant the liquid off carefully and gave them each a pinch of salt to stir in for flavor.

7. I then passed out crackers for everyone to spread a little of their butter on to taste, and then they could put the lids on and take the rest home.


Making butter


Activity #2 - Ice Cream In A Bag

(For step-by-step photos and detailed instructions and explanations, please see my previous post on this experiment.)

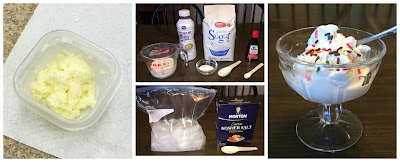
1. We began with a brief discussion about how salt mixed with ice depresses the freezing point and causes the temperature to drop below freezing, allowing us to make ice cream. I had all of the ingredients put out on two tables, with signs instructing how much of each. They formed two lines, adding 1/2 Cup of half & half or almond milk, 1 Tablespoon sugar, and  1/4 teaspoon vanilla to a small ziplock bag, and sealing, then filling a large ziplock bag half-full with ice and adding 1/3 C salt to it.


2. After making sure the small bag was sealed, they placed it inside the large bag and sealed that as well.

3. Then it was time for more shaking! Luckily, this only requires 5-10 minutes of shaking, and it does not have to be as vigorous as with the butter making. The bag does get very cold, so having gloves to wear or towels to wrap the bag in is handy.


Making ice cream in a bag

4. After 5-10 minutes, carefully remove the smaller bag and check to see if it feels firm, open and enjoy! I had intended to measure beginning and ending temperatures, but I was too busy managing the crowd. However, when I tested at home, the ice was at 0℃ (32℉) at the beginning, then after salt was added the temperature steadily dropped to about -7℃ (20℉).


Ice cream in a bag

Note: This also works with juice to make a slushy/sorbet, which I had intended to do as well, but we ran out of time. I provided almond milk as a non-dairy alternative for those who have dairy allergies or lactose intolerance. Rice milk is the least allergenic, but does not work well for this application, and I couldn't find the coconut milk, which is most recommended.

How It Went 

This did not go how I expected at all! For these monthly after school STEM programs, I typically get about 12. So for this one I expected 12-15, prepared for up to 24, and got 32! And that's not counting all the accompanying adults and younger siblings. (This ended up be scheduled on the last day before school started, which I think is why we got such a huge crowd.)

So, from the get-go I was scrambling to get more chairs set up and stretch ingredients and supplies. Fortunately, I had asked one of our teen volunteers if she wanted to come in that afternoon instead of the morning and help with the program instead of the usual cleaning, straightening, and other boring stuff we have for them to do, and one of our circ staff stepped in to help as well.

I had to ask families to share one container of cream for the butter-making, which I didn't feel bad about since it would be plenty of butter, and they would likely be glad to let someone else shake for a while! Then I had to instruct them to just get 1/3 Cup of half & half for making ice cream, and still ran out because I had not bought any extra of that. Luckily, my coworker remembered some whole milk left from another program that was in the fridge and still good. We also ran out of ice and had to raid the icemaker in the staff kitchen.

But, though I didn't have time to get into the science of the activities as much as I would have liked because of the huge crowd causing everything to take longer, both activities worked really well and everyone seemed to really like it. I heard many families saying "We'll have to do this at home!" as they were leaving. 

We did have one big mess I felt really badly about because the carpet in the meeting room had JUST been cleaned last week, and one boy managed to dump his whole container of cream in the floor (I suspect a result of horsing around) because he squeezed it and popped the lid right off. He was part of a group of 3-4 older boys that kept horsing around to the point I told them I was going to have to ask them to leave if they couldn't act appropriately. I have never had to do that before.

Another small issue was latecomers. And I don't mean just 5-10 minutes late because somebody had to use the bathroom just as you were leaving or got caught in traffic, but 20, 30, even 45 minutes into the program! Some people seem to assume these programs are just "drop in whenever you feel like it" and seem surprised when they've missed out on part of the activities and we've run out of supplies. I don't really understand this or know what to do to make it clear that it's not a drop-in, self-paced, DIY type of program. One family came right at the end of the butter-making, and got really upset because I had no more supplies and they missed it, and aggravated because they had to wait until we began the next activity to join in. But I don't know what else I could've done at that point? 


What I Would Do Differently

First, as much as I hate waste, I probably should have had even more extra supplies, and I could have used whole milk instead of half & half to help cut the expense a little. Some might suggest registration, but requiring registration is STRONGLY discouraged by the powers that be, though it would've been very helpful in this case. 

Second, I think the butter making needs to be its own program, as it takes so much longer. I could've easily spent the whole program on that, and talked even more about the science of it, let them make a larger amount and try different flavor additions, like herbs, honey, cinnamon, etc., and had a few more "vehicles" for tasting it on. The ice cream making would work well with my previous "Icy Experiments" program.

For the ice cream, we used ziplock sandwich bags and gallon freezer bags with a slider ziplock closure, but had problems with both leaking of the outer bag, and leaking of the inner bag, causing some participants to end up with "ocean-flavored" ice cream. I used to use pint freezer bags, which are more heavy-duty, but they don't have those anymore. So I would definitely recommend double-bagging the cream mixture. Some of the outer bag "leakage" was just condensation, but some were definitely leaking at the corners, so though it's additional expense and plastic trash, double-bagging the outer bag might be a good idea as well, though wrapping in a towel for shaking helps with that problem, too. 

All in all, it was still a successful program, but if I had known I would get such a large crowd I would have planned differently. I really do prefer smaller groups for STEM programs in order to really focus more on the science and attempt more advanced activities.

Wednesday, August 7, 2019

Under The Sea - Outreach Visit


Because I only have an hour in total for my monthly daycare visit, each session is short and sweet, and I don't get to see every class every time because the daycare would rather alternate than combine classes. I generally just have time to do one book and a couple of songs, but every once in a while when they are ready to start when I walk in and in a cooperative mood, I can get a second book in.

I just did Shark Week for my in-library family storytime, and I expanded that theme to include more general ocean-themed books in order to better cover the younger ages. I took the following books, but only ended up using a few:

      • That Is Not My Hat by Jon Klassen
      • How To Spy On A Shark by Lori Haskins Houran
      • I Spy Under the Sea by Edward Gibbs
      • Pop-Up Peekaboo Under the Sea by DK
      • The Pout-Pout Fish by Deborah Diesen
      • The Little Fish Who Cried Shark by Trish Phillips
      • Ten Little Fish by Audrey Wood
      • Face to Face: Sharks by Scholastic

I had also intended to take Misunderstood Shark by Ame Dyckman because I've been dying to read it, and thought the 4-5 year old class would be old enough for it (it's a little longer and the humor a little more sophisticated) but I went off and left my personal copy at home, and all of our copies were checked out at work. I was so mad at myself, because I really wanted to read that one!

Once again, the 2-year olds were outside the whole time I was there, so I did not see them at all, which has been how it's gone all summer. With each group I started with the "Hello" song, and ended with the "Storytime Is Over" song.

Pre-K Class (4-5 year-olds) 
I started by asking if anyone had gone to the beach this summer, and talking about what kinds of things we see at the beach. I then asked if anyone saw a shark, and if they would want to pet a shark. Some said yes, most said no. I asked them what they thought a shark's skin would feel like. Would it be smooth or rough? Slippery? Slimy? Prickly? Then I brought out my sandpaper shark prop and passed it around so everyone could feel it, and many were surprised. I also showed them pictures of the different types of shark teeth from the Scholastic non-fiction book pictured above, Face-to-Face: Sharks.

Ocean storytimeThen we started with everyone's favorite earworm, "Baby Shark" by PinkFong (video below). I personally prefer a slower version that I used to use prior to the PinkFong version being released and going viral, but since that's the one the kids all know, I used it.

After that, we were ready to settle down with our story song and read The Little Fish Who Cried Shark by Trish Phillips. Though this was not my original choice to read to this class, I do love the rhythm of the rhyming text and the kids love the pop-ups, especially the big shark at the end! I was going to also read This Is Not My Hat, but we ran out of time.

3-Year Old Class 
ocean storytime
I didn't spend quite as much time on the discussion about the beach and sharks for this class, but did pass around the sandpaper shark to let them see what a shark's skin would feel like. 

Then I led into our book, I Spy Under the Sea, with our story song. This is a nice book for younger kids because it is short and simple and the clues, revealed by circular cutouts in the page, are easy. It might be a little too simple for many 3-year olds, but this class seems to be a bit less mature and has a shorter attention span than most of the 3-year old classes I have seen in the past. It was perfect for this group, and they really enjoyed it.

After that, I brought out my flannel board and "Five Little Fishies" felt set for a fun fingerplay inspired by the classic rhyme about five little monkeys teasing Mr. Alligator.


Five Little Fishies flannel


Five Little Fishies

Five little fishies swimming in the sea,
Teasing Mr. Shark, "You can't catch me!"
Along comes Mr. Shark, as quiet as can be,
And CHOMPED that fishy right out of the sea!

Four little fishies.....

They loved it so much, and begged to do it again, so we did. [Normally I do repeats songs and rhymes, but I'm forced to keep these outreach visits so short that I don't always have time.]

Toddler Class
The toddlers were playing outside, but I knew how much they loved "Baby Shark" and had promised to do it this month, so I didn't want to skip them. There was a nice shady spot with a mat, so we just had a quick storytime outside!

I started with "Baby Shark" to get their attention, and then sang "Slippery Fish", which they didn't know, but some did imitate the movements. 


Slippery fish, slippery fish; swimming in the water.
Slippery fish, slippery fish; gulp, Gulp, GULP!
"Oh, no! He's been eaten by an octopus!"

Octopus, octopus; swimming in the water.
Octopus, octopus; gulp, Gulp, GULP!
"Oh, no! He's been eaten by a tuna fish!"

Tuna fish, tuna fish; swimming in the water.
Tuna fish, tuna fish; gulp, Gulp, GULP!
"Oh, no! He's been eaten by a great white shark!"

Great white shark, great white shark, swimming in the water.
Great white shark, great white shark; gulp, Gulp, GULP!
"Oh, no! He's been eaten by an orca whale!"

Orca whale, orca whale, swimming in the water.
Orca whale, orca whale; gulp, Gulp, GULP!
"BUURRP! Whoops, excuse me!"


Ocean storytimeAfter that I brought out a pop-up, lift-a-flap book from our office collection, Peekaboo Under The Sea. That did not engage them at all, and it didn't help that one of the pop-ups had been completely ripped out of the book (I had broken my own rule and not carefully reviewed the entire book, only the first couple of spreads). I find that this toddler class, without having an adult 1-on-1 to help engage them in the story, does not ever do well with books, but I feel obligated to show at least one. 

I finished with my "Two Little White Sharks" rhyme inspired by "Two Little Blackbirds" (they were very interested in my fingerpuppets), then a last round of "Baby Shark", which they loved!


Two Little White Sharks finger puppets and fingerplay

How It Went
Overall, it went very well. The preschoolers all were very engaged this time and enjoyed the stories and songs/rhymes; I just wish I had more time for them; 15-20 minutes isn't enough on the days they are really engaged. 

I am disappointed that the 2-year old classes haven't participated and the teachers have chosen to skip the storytime. I understand in the summer they need to go outside first thing in the morning, before it gets too hot, but I wish they'd be a little more appreciative of the services we provide as well. 

The toddlers are so cute and adorable, and I enjoy seeing them, but in all honesty I don 't feel storytime for kids this young in a daycare setting is very effective, and the time might be better spent giving the older kids a slightly longer session, so we could get the second book in every time. Without having a parent with them to interact with them 1-on-1 and help model engagement, reading books to them as a group just doesn't work very well. They do love music and songs, especially with hand motions, though, so I am going to have to re-evaluate what I do with them.


Saturday, August 3, 2019

Owl Pellet Dissection - STEM Program


Owl pellet dissection, science programs for kids, STEM, STEAM


My final program for the summer was of the "gross-but-cool" variety. I was not the one who initially suggested the idea, but it was right up my alley and I developed the program plan for the system.

Age Range: 5 - 10 (or older)

Registration: Yes, limited to 30 (expense, supplies not available locally, limited space)

Budget: Approximately $3/participant, minimum cost $93 for up to 30 participants, with some supplies leftover.

Description: After a discussion of owls’ habitat, behavior, diet, and what owl pellets are, participants will use scientific and mathematical skills as they dissect owl pellets, examine, sort, and identify their contents, record and analyze the results, and draw conclusions based on their results. This activity is best suited to a classroom style presentation.


I started with a very brief PowerPoint to show different types of owls, present some interesting owl facts, and go over their digestive system and how the pellets are formed. We talked about what we might expect to find in the pellets (bones, teeth, and hair), and I showed them pictures of the the bones I had found in my test run, as well as skeleton diagrams of the different possible prey animals.

Materials:
  • Owl Pellet Dissection Kit (from Pellet.com; 30 pellets, dissecting tools, and containers for bones, plus instructors manual with bone ID chart and vole skeleton diagram, $70)
  • Kid-sized nitrile gloves (Amazon, 50 pr, $13)
  • Bone chart (free download
  • Paper plates (est. 50 for $5)
  • Black construction paper (est. 50 sheets for $5)
  • Glue (optional)
  • Adult-sized gloves (I didn't think of the adults needing gloves as well until the day of the program, and we always have those on hand for staff, so these were not figured into the budget)

Activity #1 - Dissection

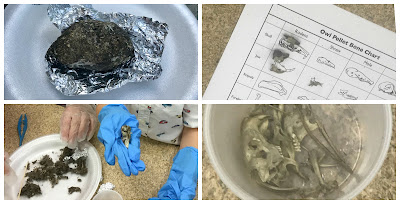
Participants used forceps, probes (bamboo skewers), and gloved hands to carefully dissect the owl pellets and remove any solid materials found. Each participant got their own pellet. This could be done in pairs, but then you have the dilemma of how to divy up the bones if multiples are not found. (Pellets are dry-heat sterilized, which kills most pathogens but gloves are still recommended as a precaution.) The bones have to be carefully dissected out of the mass, and cleaned of all the hair. There is a lot of hair packed into that little pellet!

Owl pellet dissection, science programs for kids, STEM, STEAM

Activity #2 - Bone Sorting & Identification

As the bones are dissected, they were placed on the piece of black paper and sorted. Using the skeletal diagrams, the bones were identified and recorded with tally marks on the bone chart according to type of bone and the animal it came from.

Owl pellet dissection, science programs for kids, STEM, STEAM

Activity #3 - Results & Conclusions

My intention was to discuss what we found and combine the groups tallies into a graph, but that part kinda fell apart as I realized hardly anyone was actually keeping track of what they found as I had intended. However, they were all really engaged and having a great time, and I didn't see any need to force the issue. This part would probably work better with a slightly older group, and more detailed instruction as I don't think they really understood.

Activity #4 - Skeletal Assembly (Optional)

Using the skeletal diagram, participants could determine if they had parts to make up a complete skeleton, and possibly trade with others who had extras of some parts. Then the bones could be glued in place on the diagram. Since this would require a significant amount of drying time and be difficult to transport home, I told them they could do this part at home if desired (condiment cups were supplied to take bones home).


Associated Passive Programming 

One of my co-workers put up a display of owl books the day before the program, mostly picture books but also some non-fiction and chapter book series, and I put up an owl-themed scavenger hunt with pictures of different kinds of owls.

The display helps to promote the program, and the program helps promote checking out the books, and the scavenger hunt gives kids something to do before and after the program. We always have some type of scavenger hunt going on, just pictures "hidden" around the department, often tied to a program we have that week or something seasonal. Patrons LOVE it!


How It Went

This program was messy and gross, but a huge success! I ended up with 27 kids with 18 adults. It was amazing how much people got into it, even the adults. Quite a few of the kids were accompanied by their grandmothers, and at first some of them were quite reluctant, but by the end several were gloved-up and digging into the pellets right along with the kids. 

I got a number of thank-you's and positive comments from adults and kids alike, with some of the adults commenting on how interesting it was and how they learned something new. One little girl gave me a big hug, and her younger brother exclaimed with a huge grin that he wanted to "come to the library and do this every day!"

I was a little disappointed they didn't really do the identification and recording so we could compile and discuss the results, as I do like to incorporate math when possible, but hey, it was summer and a library program, not school. What was most important was that everyone was engaged and learning and having a good time. I realized I did not give enough instruction and should have gone over in more detail how they were supposed to use the information in their packet and how to identify and record their results.


FYI - The pellets are dry and do not have any odor that I noticed. They are dry-heat sterilized; never used untreated wild pellets. We found the bones of mice and voles in all of our pellets, and almost everyone found at least one skull, and several found more than one. I found two fairly intact skulls in mine, plus the parts of two more.