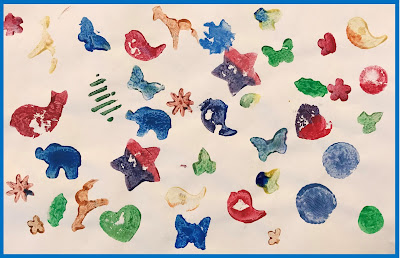
Though I've done a few programs that had an artistic or creative component, this was my first official art program. It was also the first public summer program I've been solely responsible for, though I've done outreach programs and helped with a number of public programs in the past.
Potato print making is an old tried-and-true activity that even my husband remembers doing in school, but it can be frustrating trying to carve the shape you want. Luckily I came across a quick and easy method from The Best Ideas for Kids that is more kid-friendly, especially for a crowd.
Ages: 5-10
Number: As many as you have space and potatoes for!
Time: 45 minutes - 1 hour
Budget: $15-25
Materials:
- potatoes (small potatoes will make 2 stamps, large can make 3 stamps)
- assorted mini-cookie cutters (I already owned these)
- butter knives (scavenged from home & the staff break room)
- tempera paint
- paper
- paper plates
- paint brushes
- paper towels
- paper clips
- cups
- water
- disposable tablecloths
Method:
Prep - I cut the small potatoes in half, and the large ones into 3 pieces right before the start of the program, put them into 2 bins, and spread the cutters out onto 2 trays. I also set out sign holders with illustrated directions, stacks of paper towels, paint brushes, and butter knives on the tables.
After the participants came in and sat down, I explained what we were going to do, and demonstrated how to make the potato stamps.
1. First, select a cutter, then a potato piece the appropriate size.
2. Then, push the cookie cutter into the potato. It is easier to get it started, then turn it over onto the table and push the potato onto the cutter.
3. Next, use the butter knife to slice into and around the cookie cutter, taking care not to cut under the cutter.
4. Peel away the excess potato, using a paper clip to clean up any tight corners or crevices if needed.
5. Carefully remove the cookie cutter and blot excess moisture from your newly created stamp. Now the stamp is ready to use!
(While they made their stamps, I prepped palettes of paint on paper plates and set them out on the tables (1 for every 3-4 kids to share) along with cups of water for cleaning brushes.)
6. Using a brush, apply a very SMALL amount of paint to the potato stamp. Seriously, less is more! If it looks wet, there is too much and it will slide on the paper, distorting the print. Test it out on a scrap piece of paper or paper towel first.
7. Carefully invert and press stamp onto the paper, making sure all surfaces make contact; you might have to slightly roll or rock the stamp to get all the edges and details. You can probably get 2-3 prints without having to re-apply paint.
8. Repeat!
9. I encouraged them to make more than one stamp as long as there were potatoes left, and/or to share stamps with each other or try their hand at carving their own shape as well. I provided zip-lock bags for those who wanted to take them home (they will last a few days in the fridge).
10. We made a piece of collaborative art (pictured at top) by combining prints from the stamps they created on one large piece of paper.
How It Went
It went well, but I was a hot, sweaty, tired mess by the time it was over! The room we have is not all that big, and it was packed! Initially, I had the perfect number of participants, with about 20-25 kids and their accompanying adults, which is what I had prepared for and comfortably fills the room. Then a daycare and a few other latecomers showed up, adding another 15 or so kids! Thankfully our assistant manager came in and helped set up another row of tables and chairs for them and my supervisor grabbed a few additional supplies.
After that initial panic, things went well. They were much faster at making the stamps than I expected, so I wish I had prepped the palettes of paint and cups of water in advance. I also forgot to tell them to use the brushes to apply a light coat of paint to the stamps, though it was on the printed directions at each table, and they started out dipping the stamps into the paint and using WAY too much paint. Also, some did not understand that the shape was supposed to stay attached to the potato, and they sliced it right off and used it by itself, which can work, but is not as easy and is more messy. I found kids and adults completely ignored the illustrated instructions placed on the tables.
I ended up with a total of about 40 kids and 20 adults, and we went through 20 pounds of potatoes!
This is a great technique to use for making your own wrapping paper or customizing plain gift bags or boxes. It can also be used with fabric paint on clothing or bags.


No comments:
Post a Comment