This is from last fall, shortly before I left my previous position, when I was *finally* able to do an in-person STEM program for the first time in a year and a half! Things were too hectic at the time to write it up due to job hunting, interviews, and moving, but things are slightly calmer now. Unfortunately, I did not get many pictures from this program.I kept this program really simple due to not having a lot of time to plan and prep because of understaffing and not really expecting a big turnout for the first program after not having any for so long. So instead of 2-3 activities, I just kept it to one. This program fell during the month of our community read, and I was asked to have at least one program from each age group to tie in with it. The community read for adults was a cookbook (an odd choice for a community read if you ask me, which they didn't), and the one for kids was a "kitchen chemistry" type of book, with science experiments related to or using food, which was right up my alley.
I decided to do the activity of using yeast to blow up a balloon to demonstrate how they produce CO2 (carbon dioxide) gas, which is what makes bread dough rise and leaves all the little holes in the bread, and to make it a true experiment we would test different water temperatures to determine which one was optimal.
Ages: 5-12
Time: 1 hr
Budget: $10 for up to 20 or so kids
Materials:
- baker's yeast (you can buy a 1 lb bag from Amazon for the same price as a few packets at the grocery store, and less than a 4 oz jar)
- sugar
- water of various temperatures
- latex balloons
- 16 oz plastic bottles with narrow neck
- thermometer
- funnels
- 1 c liquid measuring cup
- measuring spoons (1 T, 1 t, 1/2t)
Before beginning our experiment, I first showed them what the dried yeast looked like, and explained it was actually a living organism, not quite plant or animal, classified with fungi. I showed them pictures of yeast under the microscope, and how they reproduced by budding. Then I explained their metabolic process, that they consume sugar, breaking it down into water, alcohol, and carbon dioxide gas and that this reaction is why yeast are used to bake bread and make wine and beer, that the gas given off produces bubbles that make the dough rise and why bread is full of little holes.
1. Prior to the start of the program, use a funnel to pre-fill balloons with 1 Tablespoon of yeast, and start heating water to boiling. (Actually, you can probably skip this and just add the yeast to the bottle with the sugar; since the reaction isn't immediate or as fast as with baking soda and vinegar the delay in getting the balloon on the bottle probably won't matter.)
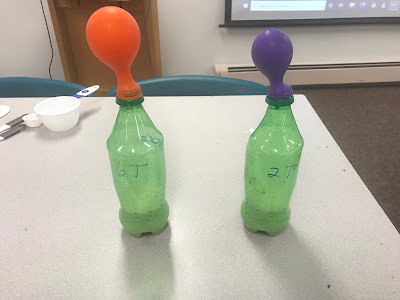
2. The amount of yeast and number of bottles you have available will determine how you divide things up. Ideally, each group would be able to have 3-4 bottles to test all the temperatures and allow each participant to do more. I didn't have enough bottles, so I divided into pairs and each pair tested one temperature. Since the tables were arranged in a "U" shape, they could easily observe each other's reactions. Measure the water temperatures and label each bottle with the temperature water to be added (we did room temp, 90 degrees Fahrenheit, and near-boiling)
3. Add 1/2 t sugar to each bottle (in hindsight I realized we should have used a whole teaspoon).
4.Give pairs/groups 1 yeast-filled balloon per bottle.
5. Starting with the bottles for the coolest temperature first and working up to the hottest temperature, add 1/2 C of the appropriate temperature water (an adult should add any water that is over 100 degrees Fahrenheit!) to the bottle, then *carefully* but quickly stretch the neck of the balloon over the top of the bottle *without* letting any of the yeast fall out or into the bottle yet and without making any little tears in the balloon.
6. Once the last bottle is ready, quickly raise the balloon and jiggle so that all of the dry yeast falls down into the bottle and swirl the bottle until the yeast, sugar, and water are mixed (but do not shake).
7. Set the bottles down and observe how fast the yeast grows at each temperature, by directly observing the yeast in the bottle and by observing how much gas fills the balloon.
Results
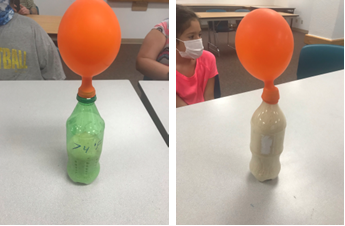
We had a bit of a fail initially, when I observed that the balloon on the bottle that *should* have been the optimal temperature (around 95 degrees F) and thus fastest growing was not inflating as much as the room temperature bottle, though I observed there was much more foamy growth in the bottle.
I brought this to the kids' attention, and asked them to observe the balloon as well as the growth in bottle compared to the others. They quickly observed that there seemed to be much more growth and activity as compared to the others, yet the balloon was not inflated as much, and that this did not make sense. I asked them what they thought the explanation could be, and they thought a minute, then quickly hypothesized that the balloon had a leak. I asked how we could test that, and they said try a new balloon.
I carefully changed the balloon and we were all amazed to see how quickly it blew up! Even with having lost a considerable amount of gas with the first leaky balloon, it soon became fully inflated. This also shows the need for duplicate tests to corroborate results. Our results were that the room temperature bottle showed a fair amount of growth and inflated the balloon, but that it was less than in the 90 degree F bottle. The bottle with near-boiling water (about 180 degrees F by the time it was actually added to the bottle) showed no growth nor any balloon inflation.
From this, we concluded that 90 degrees was the optimal temperature (of the temperatures tested) for yeast growth and CO2 production, but that yeast could survive and grow at room temperature (around 70 degrees F) as well, but more slowly, and that yeast could not grow at near boiling temperatures. Another interesting observation was that as the bottle with the near-boiling water cooled, the balloon actually inverted and became sucked inside the bottle, which gave us an opportunity to talk about the properties of gases and gas laws; how the molecules have more energy and spread apart at higher temperatures, but lose energy and condense at lower temperature, decreasing the pressure and creating a vacuum in a closed system.
How It Went
Though there was a little snafu, it created a great teachable moment and opportunity for critical thinking, and it was corrected in time to still see an impressive result. I also loved the additional opportunity to discuss gas properties and the production of the observed vacuum, which was a nice bonus.
Though I didn't think this was necessarily the most exciting experiment, the kids that participated really enjoyed it and were very engaged. It was a good lesson for me that sometimes a single activity more thoroughly investigated and discussed is enough, maybe even better, than rushing through multiple activities. The turnout wasn't great, about 8 kids and a couple of adults, but that wasn't surprising since we were just getting started back with in-person programming, and unfortunately the older kids really weren't coming to the library like they used to.
Suggested Activities
Other versions of this experiment could be done testing other variables, while keeping the water temperature the same. For example, try different amounts of sugar, different amounts of yeast, different brands of yeast. Just be sure to only test ONE variable at a time and keep all other factors the same. I actually did a quick demo comparing using 1/2 t of sugar and 2 t of sugar. The kids of course thought four times as much food should mean 4 times faster growth, but our result indicated that much sugar actually inhibited growth, but I think this may need to be tested and replicated to be sure.
No comments:
Post a Comment