I started this job in December, just as the Omicron variant of Covid was hitting, so decided not to do in-person programming for a while. In January I started putting together take-home STEAM kits that were a combination of STEM activities and arts & craft activities, generally designed for ages 5-10, but some may skew slightly older or younger, and adult assistance/supervision is recommended for some activities, particularly with kids at the younger end.
January's was a re-mix of the Snowflake Science & Icy Experiments I did last year as a hybrid program, but decided to drop the video portion as no one seems to be interested in virtual programs anymore. In February, I combined the foam heart collage activity inspired by Michael Hall's My Heart Is Like a Zoo that I included in a previous early literacy kit, and the "conversation heart chemistry" experiments from the last in-person STEM program I did before the pandemic hit.
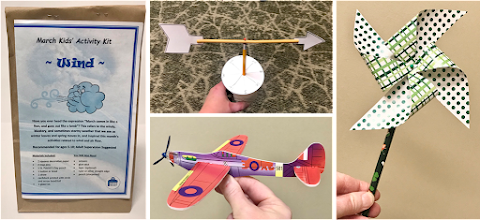
I took the inspiration for the March kit from the old saying, "March comes in like a lion, and goes out like a lamb". The change from winter to spring often brings blustery, windy weather as warm and cold fronts battle it out, so I decided to include activities related to wind and air flow.
Age: 5-10yrs
Budget: $43 for 24 kits ($1.80/kit), with straws and pins leftover, could be done cheaper using regular paper, plain pencils, and plastic straws. I splurged a little since we haven't spent much of our programming budget.
Included Materials: - paper squares, size depends on stiffness of paper
- 2 map pins
- 2 pencils
- small bead (smaller than pony beads)
- cardstock circle
- cardstock arrow head & tail
- straw
- foam or balsa wood glider kits (I got the much cheaper foam)
- brochure with step-by-step instructions, photos, thought questions, links to more info, and where to find books on wind, weather, windmills, wind energy, and airplanes
- coloring sheet
- windy weather word search puzzle
Materials Needed From Home:
- scissors
- glue
- ruler or other straight edge
- tape
[the previous community where I worked, I was not comfortable assuming people had or could easily get basic supplies at home and felt like I had to supply everything. But where I am now is a very different community, and I am comfortable assuming they have or can easily get the basics like scissors, glue, tape, and crayons or markers at home, which makes assembling kits a lot easier and faster!]
Activity #1 - DIY Pinwheels
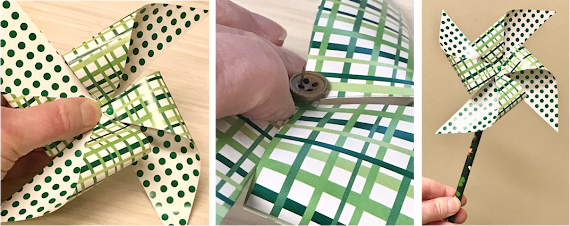
I wanted to add a little St. Patrick's Day flavor to this kit, so I bought a set of double-sided decorative papers in assorted St. Patrick's Day colors and patterns. The reverse side had a different pattern than the front, making them perfect for pinwheels. The size pinwheel you can make depends on the stiffness of the paper. I found that 5" was the largest I could make that would spin decently. I also bought shamrock patterned pencils for this activity. I put 2 squares in each kit so they would (1) have a choice, and (2) have an extra for a do-over if they messed up the first one. I also gave them this wiki link for instructions with video, including instructions for a 6-pointed pinwheel: https://www.wikihow.com/Make-a-Pinwheel
1. Using a straight edge, draw a line from one corner of the paper to the opposite corner; repeat for the remaining two corners. Draw a circle about the size of a dime around the point where the two lines intersect in the center. Place a small square of transparent tape over this circle to reinforce the center.
2. Cut along each line almost to the center, stopping at the edge of the circle. Fold one corner of each of the resulting triangular sections to the center, making sure they all overlap, and hold. Applying a little glue from a glue stick to the tips will make this easier, especially if using decorative papers that are slippery.
3. With the help of an adult, push the map pin through the center of the pinwheel and wiggle it around a little to enlarge the hole slightly. Then add a small bead to the back [I didn't have beads small enough and substituted buttons], and insert into the side of the pencil eraser without going all the way through.
4. Take your pinwheel outside on a windy day or blow on it and watch it turn!
Q: How does the wind cause the pinwheel to turn? Would a 5- or 6- pointed pinwheel work as well as a 4-pointed one? Better? Try it and see! (Hint: start with a pentagon for 5 points, or a hexagon for 6).
A: The curved points catch the wind like a sail; if the wind pushes hard enough against it to overcome inertia and friction it moves, bringing the next point around to catch the wind. A 5- or 6-pointed pinwheel would work even better, but is also more difficult to make.
Activity #2 - DIY Weather Vane
1. Color (if desired) and cut out the circle, arrow head, and arrow tail that are printed on cardstock. Then draw two lines through the center of the circle, dividing it into fourths, and label the endpoints of each line N(orth), E(ast), S(outh), and W(est). Then draw two more intersecting lines dividing the circle into eights and label NE, SE, SW, and NW.
2. Carefully cut slits about 1" long at each end of the straw, making sure they are lined up in the same plane. Apply a small amount of glue along each slit, then insert the arrow head in one end and the tail into the other. Let dry.
3. Using a sharpened pencil, poke a hole in the center of the directional circle and insert the pencil through it. Insert the map pin through the center of the arrow and into the top of the pencil eraser.
4. Hold your weather vane outside on a windy day so that the directions on the weather vane are properly aligned and see which way it points!
Q: Can you think of three ways you can be sure the directions are properly aligned?
A: Sun rises in the east, sun sets in the west, or using a compass.
Q: Which way does the arrow point? The direction the wind is blowing towards, or the direction the wind is blowing from? Why?
A: The direction the wind is blowing from. The tail of the arrow is larger than the head, so will catch more wind, thus the wind pushes the tail away.
Activity #3 - Glider
1. *Carefully* remove all the glider pieces from the package, do not bend as they will break easily, and identify the fuselage (body), wing, propeller cone & shaft, propeller blade, nose piece, and horizontal stabilizer (part of the tail).
2. Carefully insert the horizontal stabilizer through the smaller slot in the tail of the plane, and insert the wing through the large slot in the middle of the fuselage.
3. Separate the propeller pieces and thread the blade onto the shaft, and insert shaft into clear nose piece, then carefully attach to the nose of the fuselage.
4. Hold your glider at the base of the plane and gently toss forward and slightly upward. Practice until you find the right combination of force and direction that results in the longest flight.
Q: Is the propeller necessary? What happens if you leave it off?
A: Probably not. In real life, glider planes do not have propellers or engines. Removing it should only have a negligible effect due to the loss of the weight of it.
Q: Is the nose piece necessary? How does the glider fly without it?
A: Weight is usually needed at the nose of a toy glider to keep the nose down and allow it to go forward rather than up. But too much weight will make it go down too quickly.
Q: What would happen if you put the wing or horizontal stabilizer on backwards?
A: I don't know; try it and find out!
Q: How do gliders fly?
A: Glider have no engines, so rely on initial velocity provided by a person throwing them (toy gliders and paper airplanes), catapults to launch them, or being towed high in the sky by another plane. The lift provided by the wings from air moving under them as the glider moves through the air keeps the glider flying until drag and gravity gradually force it lower and lower until it reaches the ground. For more info, check out these articles and video:
I also included a sheet with a coloring page portraying the "in like a lion, out like a lamb" saying on one side, and a March Winds word search puzzle on the other. I made 24 kits, which were all picked up within 3 days; I probably could have given out even more than that. If you're wondering why I didn't do the obvious and include kites, it's because I have never, ever seen anything but real, full-size kites work. All the smaller kites my kids ever made just led to frustration because they were purely decorative and would not fly.
These kits have been very well-received by patrons, but I still feel like they're not a true substitute for in-person programming as a lot of the science that I would discuss with them is lost. But, they are better than nothing, and provide a means to keep families engaged with the library and continue to have positive associations.
I will try to continue offering these occasionally even after I start in person programming, if I can manage to find the time or gain the staff to assist in preparation, that is. It will be a good way to use up leftover materials after in-person programs.


No comments:
Post a Comment