
Back in 2019 I had the opportunity to do something I'd always wanted to do - a mini 'gingerbread' house program inspired by the graham cracker 'gingerbread' houses I used to make with my daughter. I eschewed what apparently has become common practice of pre-assembling the houses or using cartons/boxes to build them on in favor of an open-ended STEAM approach, allowing kids to fully express their creativity and empowering them to use their engineering and problem-solving skills. It turned out to be a huge success, and I was really looking forward to making it an annual program.
But we all know what happened next: the pandemic hit, libraries shut down, then re-opened without in-person programming for the remainder of 2020 and much of 2021. During that time I changed libraries twice; first due to pandemic lay-offs, then to find a better fit. So by the time the pandemic had eased up enough to allow in-person programs and for me to be comfortable with anything food-based, I found myself in a library and community much different from the one were I did my first gingerbread house program. I have observed that people here and now seem to have a harder time following instructions and figuring things out, so I wasn't comfortable with diving in with a huge program like I did before. I decided to quietly do a small-scale program for one specific age group as a test run this year, and see how it went.Most of the kids who had attended previously were in the 5-10 age range, which was perfect since I have a regular monthly program for that age I call "Kids Club", with different activities each month. I hinted at what we would be doing with terms like "holiday building challenge" and "confectionary architecture" in the description, but did not come right out and say gingerbread houses, nor did I include any images other than our generic "Kids Club" logo. I knew if I included images and publicized it, I would be overrun with people of all ages. I did everything pretty much the same as previously.

Materials & Supplies:
- 8" cardboard cake circles, preferable coated to be be greaseproof (the ones I bought from the same vendor as previously were advertised as coated, but this time what I received was plain, uncoated cardboard)
- aluminum foil (only if you cannot get coated cardboard circles)
- 10" disposable piping bags (I bought in bulk from Amazon)
- rubber bands
- store-brand graham crackers (at least one box for every 5 participants, plus at least one extra for breakage)
- small (10 oz) cans of frosting (1 for every family, available at DollarTree or Wal-Mart)*
- large (16 oz) cans of frosting (1 for every 3 participants), these are to fill piping bags*
- small candies for decorating (mini candy canes, mini M&Ms, Smarties, gum/spice drops, starlight mints, etc)
- other optional additions: teddy grahams, mini pretzel twists (really small ones) or sticks
- paper plates
- serrated plastic knives
- small bowls/cups to put candies in
- spoons/tongs for candy dishes
- scissors
- My co-worker set out the following at each of 10 seats: paper plate, cardboard circle, piece of aluminum foil, plastic knife, and 4 graham cracker sheets.
- While they were doing that, I snipped the ends of 10 piping bags and filled each with 1/3 of a large can of icing, twisted, and handed off to co-worker to rubber-band then placed one at each place (see note about icing at the bottom)
- Put the various candies out in bowls with tongs or spoons.
- As participants entered, I instructed them to first wash their hands, then went over basic safe food handling rules that we had to follow since we were doing a food-based activity in a group environment and sharing supplies:
- Wash hands
- Keep hands out of mouths & noses and away from faces
- No eating until the end of the program
- No licking fingers or knives
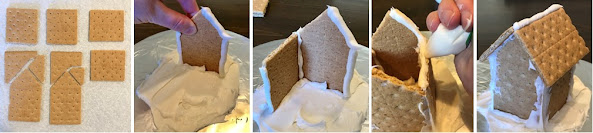
- I was going to show the PowerPoint with basic instructions and tips that I had made before, but discovered our laptop had been stolen, so I just demonstrated and went over them. The key thing is to *saw* the crackers with the knife using very little pressure, not cut, and spread a thick base layer of icing on the cardboard circle (first covered with foil if using uncoated cardboard), to within 1/2" of the edge (leave a clean edge for carrying). I showed them how to build my basic example, but encouraged them to be creative and do their own thing.
- I then passed out one of the small cans of icing to each family. This is primarily to use for the base layer of icing and for extra icing for the piping bags if needed. This proved to be too much icing for most, so next time I'll probably just buy all larger cans and dispense globs in dixie cups to each person (I would prefer to buy bulk icing, but it's actually a lot more expensive).
- I then gave them the final, and most important tip of all: To remember the point is to have fun, not make a perfect house! So don't worry if your house is crooked, cracked, or lopsided. Most mistakes can be hidden with icing and candy, and there are no building codes in gingerbread land! And if it crashes, you can eat it.
- Then I put on some Nutcracker music with a fireplace video on in the background, and let them have at it!


Since it went so well, I think I'll try a big, family program mini-gingerbread house in December and a haunted gingerbread house program for the teens in October next year.
No comments:
Post a Comment