
I was searching for inspiration for my November STEM program, and looked up a list of holidays and observances. When I saw that November 2nd was "National Pumpkin Destruction Day", I immediately thought of the "Pumpkin Chuckin'" competitions I'd seen on television, where they build huge catapults and sling-shots to see who can throw pumpkins the farthest, and knew building mini-catapults to hurl candy pumpkins would be the perfect foundation of a "Pumpkin Science" program. I easily found several other related activities, settling on pumpkin volcanoes, a pumpkin battery, and pumpkin investigation.[Click on any image to see larger.]

Ages: 5-10
Time: 1 hour (most were done by 45 minutes)
Number: 12 (prepared for up to 24, but snow and cold kept many away)
Budget: $30
Materials:
- 1 large pumpkin (mainly for the guts)
- 5 small pumpkins (I used pie pumpkins)
- 3 or more small pumpkins of unexpected shapes, sizes, and colors
- 50 craft sticks, plus extra for back-up and experimentation
- 250 small craft sticks, plus extra for back-up and experimentation
- 24 plastic spoons, optional
- 100 rubber bands, plus extra for breakage and experimentation
- 24 lids, about 1" or slightly larger, such as from a gallon milk jug
- hot glue gun & glue sticks
- 3 bags of small candy pumpkins (like candy corn)
- several large bowls and/or cardboard targets
- 2-3 boxes baking soda
- 1 gallon vinegar
- food coloring
- dish soap
- 2" deep dish/bin for containing "lava"
- 1/4 dry measuring cup
- 1 Cup liquid measuring cup
- tape measure
- ziplock bags
- kitchen scale (if you happen to have one)
- Potato Clock kit (or zinc and copper strips, wires, and very low voltage digital clock)
- Towels
- Paper towels
I set everything up as separate stations, since we really couldn't afford to buy pumpkins for everyone, and wouldn't have room to store them if we did. I had everyone come in and have a seat along the wall while I welcomed them and gave a brief introduction and instructions for each station (there were also signs with step-by-step instructions and photos at each station), and safety rules, which were mainly no shooting pumpkins at or near any people, and no eating of the ammunition, because it would be dirty and they'd run out. [I told them I had an extra bag of candy pumpkins I would had out at the end to eat, after they washed hands.]
Activity #1 - Mini-Catapults & "Pumpkin Chuckin'"
Prep - I bundled up 8-10 small craft sticks, 1 large craft stick, and another large craft stick with a lid hot-glued at the end (leave a small amount of the stick showing so you have something to push down on) for each person, then put them out on the table with 4 rubber bands each, along with instructions, extra supplies, examples, and spoons for an alternate design.

1. First, stack together several small craft sticks and wrap a rubber band around one end.

2. Next, insert a large craft stick in between the first two small craft sticks, then put a rubber band around the other end of the stack.

3. Hot glue a milk top to the end of a large craft stick, leaving some of the stick showing, and let cool (I prepped this part in advance). Then attach the other end of the stick to the short end of the base with a rubber band.

4. Do a couple of test launches to determine where you want to place the fulcrum (stack of small sticks), then wrap the final rubber band around the intersection of the four sections to hold it in place. Experiment with the number of sticks in the stack, and where it is placed and see how it changes the distance and trajectory. [An alternate design uses a spoon in place of the craft stick with attached lid, or rubber banded onto the craft stick.]

5. Place the payload (candy pumpkin in our case) in the bucket, hold the base down with one hand, press the end of the arm down with the other hand, then let go! (We learned the hard way that you have to leave room at the end of the stick to push down on, as pushing on the cap will cause it to pop off after a couple of launches.)

6. I set up a target range along one wall of the room. First, I placed a long table perpendicular to the wall on each side, with two large bowls at the far ends to try to aim their pumpkins into (placing a small towel in the bottom helps keep the pumpkins from bouncing out), and a small bowl of ammo at the near end. Then in between the tables I put a large cardboard standing jack o'lantern with cut-out eyes leftover from last year's Halloween party for them to try to shoot thru the eye holes. This provided ample space for a number of kids at once, and I reminded them to take turns and visit the other stations so everyone got a chance.

They had a blast! I even managed to capture a couple of pumpkins mid-chuck, and got some slow-motion video:
Activity #2 - Pumpkin Volcano

You can't go wrong with any activity that involves mixing baking soda and vinegar! 😉 I had two stations set up on a table, and I did a demo first so they could see how to do it, then let them take turns doing it. [The pumpkins had to be washed out in between turns, which the adults were really great about doing while I was helping kids with the other activities. I strategically set this station up very close to the sink!]

1. Add 1/4 Cup baking soda, a few drops of food coloring, and a few drops of dish soap to a small, hollowed-out pumpkin (pumpkin should be sitting in some type of dish to catch the overflow of "lava").

2. Pour in about 2/3 cup of vinegar all at once, and watch the eruption of bubbling foam!
3. Empty pumpkin, rinse out, and repeat! They never tire of this, and will use up however much baking soda and vinegar you make available to them (and ask for more!).
Activity #3 - Explore A Pumpkin

For this one I provided several small pumpkins in various shapes and colors, a pumpkin cut in half so they could see the internal structure, a measuring tape, a deep bowl of water, and pumpkin guts (from the one large pumpkin) in a ziplock bag and in an open bowl for those who were not squeamish (I also meant to bring my kitchen scale, but forgot it). On the table was a sign with a labeled diagram of a pumpkin, and several prompts for investigation:


- Does it sink or float?
- How tall is it?
- How big around is it (circumference)?
- How heavy is it?
- What color is it?
- What shape is it?
- Is the skin rough or smooth?
- What does the inside look like?
- What do the insides feel like?
- Are all pumpkins alike?
- (Forgot to add this one) What does it smell like?
I thought about giving them papers to record their observations, but then decided against it because I felt like that made it too much like school or homework.

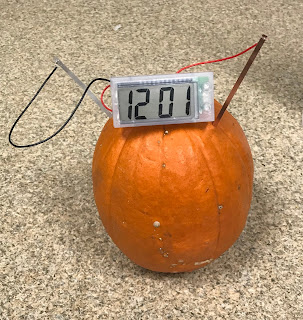
Activity #4 - Pumpkin Battery

I've always wanted to try this, but was a little skeptical it would work, but it really does! Not all kits work equally well, but I highly recommend this Potato Clock kit I got from Amazon. The clock in it requires extremely low voltage to work, so just one pumpkin is enough; other kits required 2-3 in series to work (it will work with many fruits and vegetables; I also tried it with a potato and an apple).
1. Connect the copper strip to the positive wire, then connect the zinc/magnesium strip to the negative wire.
2. Insert the electrodes (metal strips) into the pumpkin about an inch; ensure that they are not touching. The skin is hard to pierce so hold the electrode close to the bottom so that it doesn't bend as you push it. [The small chunk is cut out because one young participant pushed the electrode all the way into the pumpkin, and I had to cut into it in order to retrieve it.]

3. Voila! The clock is now running! One Amazon reviewer claimed that he kept the clock running for 11 weeks with a single potato!

How It Went
Although I was disappointed the weather kept the turnout from being what I expected, I still had a decent crowd, and this program was very easy to set up, didn't cost a lot, had surprisingly little clean-up, and was a lot of fun!
Predictably the most popular activities were the Pumpkin Chuckin' and the Pumpkin Volcano. Surprisingly, several kids were already familiar with the fruit/vegetable battery, though had not seen it done with a pumpkin before (apparently, a potato battery is mentioned somewhere in the Diary of a Wimpy Kid series, because one kid exclaimed, "Who knew the Diary of a Wimpy Kid would teach me science!" The pumpkin exploration center did not see as much activity or excitement as the others, but some did do it, and it was nice to have on hand for the younger siblings who had to tag along but couldn't really handle the other activities.
No matter how many times they see some version of the baking soda and vinegar reaction, they are always enthralled with it, especially when done on a large scale. The trays I had the pumpkins in were not quite deep enough to contain all the foam, but the overflow was never excessive and just added to the excitement. Shockingly, there really wasn't much mess to clean up, either.
I had hoped they would do a little more experimentation with their catapults, but they were too eager to hit the target range. I was pleasantly surprised that they managed to resist temptation and did not eat the candy pumpkins reserved for ammo; I think letting them know in advance that I had a bag reserved for eating afterward helped motivate them, as well as not wanting to run out of ammo. I was proud that they also refrained from shooting at each other, and impressed at how well they picked up all the little pumpkins off the floor; I think I only had to pick up one or two at the end.

What I Would Do Differently
In all honesty, I don't think I would do anything differently except to be sure when gluing the lids on the sticks for the catapults that room was left so that you could push down on the stick itself, not the lid, because I quickly found that the force would cause the lid to pop right off. But I had the glue gun handy and could quickly fix them when that happened.
If I had an older group that had a little more patience and more developed problem solving skills, I could probably do a program just on the catapults, and have them build and compare a couple of different designs, test and see how different tweaks and adjustments changed their firing range, and talked a little more about the physics involved, as well as the history. But what we did was perfect for the ages and personalities of the group I get.
Even though the "Pumpkin Exploration" table didn't see as much activity, I still think it's important to provide the opportunity to practice basic scientific observation. Plus it was really handy to have for the younger kids. One toddler enjoyed holding and looking at the smallest pumpkins, and squishing the bag of pumpkin guts.
No comments:
Post a Comment