June is National Dairy Month, which I used for the theme of our first week of summer programs. For the big family event I had a mobile dairy classroom come give a presentation on dairy nutrition and farm to table with a milking demonstration, along with a life-size fake cow simulator from our local extension office that the kids could try to milk. I also did dairy cow-themed storytimes and a book display with cow, dairy, and farm books.
For the elementary-aged program I decided to do butter-making, which is fun to do and I thought would appeal to our large homeschool population in particular. It would also be a program that any younger siblings tagging along could participate in. I've done this as a program once before, but this time I discovered a couple of tricks to make it go a little faster/easier (more on that below).
Prior to beginning the activity, I talked about the different kinds of dairy cows, how butter is made, the science behind it, and the process we were going to use, accompanied by a brief slide show. I warned them they were going to have to shake their containers REALLY hard, and demonstrated. I also warned them not to SQUEEZE their containers because, depending on the container, the lids might pop off or the container might crack. Soft hands, strong arms! I explained the steps both on a molecular level, and what it would look and sound like as they did it.
Age Group: Elementary (ages 6-10), would also work well for family program
Time: 1 hour
# Participants: 40 (individuals, can accommodate more if siblings/families share 1)
Budget: $60 with optional items/$45 without, $1.13-$1.50 per participant or family
Materials:
- 40 1/2 cup plastic storage containers, $12*
- 3 quarts heavy cream, $15
- 40 glass marbles, $5 (one of the tips for making it go faster!)
- 40 plastic knives, $5
- small dixie cups, $2?
- 2 boxes crackers, $5
- salt, $1
- honey, $5 (optional)
- garlic paste, $5 (optional)
- herb paste, $5 (optional)
1. Here is the other tip for making it go faster - Take the cream out an hour or two in advance and allow to warm up to near room temperature. This cuts 5 minutes off the shaking time.
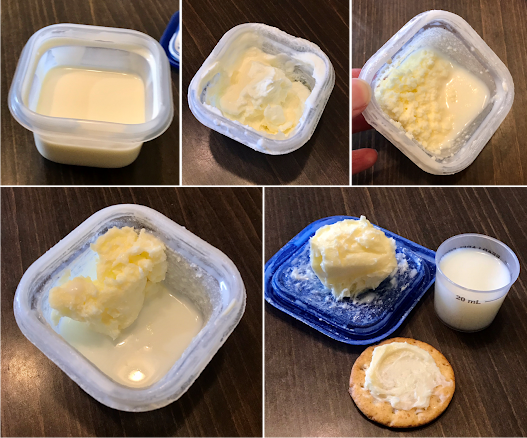
- As you begin shaking, you hear the liquid cream sloshing around. As this stage the butterfat is small globules.
- After a few minutes of shaking, you no longer hear sloshing or feel movement. At this stage, the globules have been broken up and fairly evenly distributed to create a foam, what we know better as whipped cream.
- Keep shaking, and eventually you will start to hear liquid sloshing again, as the liquids and fat solids begin to separate, leaving one big glob of solid (but soft) butter and liquid buttermilk. Keep shaking until you have a nice solid defined glob of butter.
Allowing the cream to come to room temperature, or close, and adding the marble really made a big difference! It went faster, with less frustration and less adult help required than previously. The only minor problem was that despite being cautioned not to squeeze the container, 3 kids did end up cracking them (but that was better than popping the lids off!). I did have a couple of extras, but the third kid just had to wrap theirs in paper towels and make the best of it. If you have heavier containers, this shouldn't be a problem, though they will be more expensive.
The best part was seeing all the kids get up and start dancing and shaking along to the music. Last time, the speaker I had was too small, and they couldn't really hear the music over everything else, but this time I had a good speaker. It definitely made it even more fun.
Most of the kids reported liking the buttermilk, but did note it was different than regular milk, and they all liked the butter, though one did say he regretted adding honey to it and liked it better plain. I had a total of 38 kids of the target age (6-10 years old), and several younger siblings, for a total of close to 45 kids and about 20 adults, so it was a packed program!


I used to do butter-making demonstrations when I worked at a living history museum, it was always eye-opening to my city kid audience to find out where butter comes from!
ReplyDeleteMy library is in a small, somewhat rural town, but there are almost no working dairy farms left in our area, so this was new for most of them, too. A friend from library school also worked at a living history museum prior to becoming a librarian, and loved it.
Delete