Showing posts with label Family Programs. Show all posts

Thursday, January 2, 2025

Happy Noon Year's Eve! - Kids' Program


I once helped my supervisor with a Noon Year's Eve program several years back, and have been waiting for the chance to do one myself, and this year things finally aligned. Since this was a new thing for this library I wasn't sure how many families would attend, but I planned more activities than I typically do just in case everybody had cabin fever and decided to show up. As it turned out, we ended up with the perfect size crowd and we all had so much fun that we decided we definitely want to do this again next year.

I planned it as a family/all-ages program, with activities that were geared for elementary ages, but would also work for preschoolers, and a finale at noon:

  • DIY Confetti Poppers
  • Decorate a Crown or Hat
  • Make a Noisemaker
  • Fireworks Painting
  • Mini-Megaphone
  • Fizzing Confetti Chemistry
  • Countdown & Balloon Drop
I had enough at each station for 24-36 participants, and the fireworks painting and fizzing confetti could easily be stretched for even more if needed. I did splurge a little on this program, mainly on confetti of all things (!), but you could definitely do it for less. Not counting craft staples or other materials we had already (markers, glue, tape, craft sticks, paper plates, hats, some crowns, a few extra cardboard tubes.) , I estimate I spent about $130, but I have confetti, pom-poms, jewels, and balloons leftover, and again, you could definitely spend less on confetti, balloons, and paint than I did.

Budget: $130, but had stuff leftover & you could definitely spend less

Age Range: Family, kids ranging from 2-10 years old.

# of Participants: 32 kids (plus 23 accompanying adults), could have accommodated a few more 

Staff: 1 Children's Librarian, with the help of 2 part-time assistants (one was in and out during the program because she was also covering the desk). 

#1 - DIY Confetti Poppers
I put all of the materials in containers in the center of the table, along with instructions with photos in a sign-holder. No one had any trouble, and everyone loved them!


Materials:
  1. Tie the end of the balloon.
  2. Cut off the top of the balloon.
  3. Put the balloon over one end of the cardboard tube and tape in place.
  4. Decorate tube if desired.
  5. Put a little confetti and a few pom-poms in the tube.
  6. Pull balloon, and release. POP! Confetti everywhere!
* I splurged on the confetti, buying several types. You could definitely spend less by buying a bulk package of just one type or mix, and you could make your own by cutting up bits and punching holes from colored paper if you have the time. That would be a good job for people working at the desk to do during less busy times.

#2 - Decorate a Crown or a Hat
Very straightforward, put out the materials and the decorated their crown or hat as much or as little as they wanted.


Materials:
  • cheap, plastic top hats, (no cost to me as I inherited a bunch and only included them because I already had them, otherwise I would've just stuck with crowns)
  • metallic cardstock crowns, assorted styles and colors, (I was gifted a dozen of these)
  • gold cardstock crowns, assorted styles, 10 for $8, included sticker gems
  • strips of construction paper (for bands around top hat)
  • adhesive jewels (they came on 3x5 or 4x6 sheets, which I cut up into roughly 1 square inch pieces), $10

#3 - DIY Noisemaker
Again, put out all the materials in the center of the table with instructions in a signholder, along with an example.

DIY noisemakers, new year's eve, noon year's eve craft

Materials:
  • Small paper plates (I think ours were 4"), 2 per noisemaker
  • Large craft sticks
  • Dried beans (we used black-eyed peas for luck), 2 lbs for $4
  • Masking tape in assorted colors
  • Markers or crayons for decorating
  1. Turn both plates face down and decorate the bottom/underside of the plates as desired.
  2. Turn one plate over, and tape a craft stick to the lower half to be a handle.
  3. Place a spoonful or two of dried beans in the center of the plate.
  4. Place the second plate on top, and tape all around the edges to seal.
  5. Shake! 
Note - You could use a stiffer plastic plate and omit the handle and hold like a tambourine as well.

#4 - Fireworks Painting
These turn out really well if the kids follow instructions and stamp rather than swirl the cut straws.

Noon year's eve, new year's eve, fireworks painting with straws

Materials:
  • paper
  • washable tempera or craft paints (we used glitter paint, 8 4oz-bottles for $15)
  • small 4" plastic plates to dispense paints on to (pack of 8 for $1.25 at DollarTree)
  • assorted straws, we used both regular and boba tea straws
Prep: Unless working with kids over 10, I recommend prepping the straws in advance. Cut the bottoms of several straws into many small sections and bend back so that looks like a starburst/flower. We made varied lengths for larger and smaller fireworks. Dispense one color of paint in the center of each plater and tilt plate to spread it out some.
  1. Press the cut end of the straw into the desired color paint, making sure the entire length of the slivers are coated.
  2. Press the painted end of the straw onto the paper; lift up and rotate slightly, then press again. Use the straw like a stamp, not a brush. You can layer colors for some nice effects if you are careful.
  3. Repeat with different colors to make more fireworks.
  4. Let dry.
#5 - Mini-Megaphone
A super cheap and easy filler craft, but we could have skipped it.


Materials:
  1. Place included stickers if desired.
  2. Color
  3. Roll up, insert tabs.
  4. Tape for less frustration

#6 - Fizzing Confetti Chemistry
A super simple STEM station using one the many variations of baking soda and vinegar experiments. We had this station staffed to prevent disasters, LOL! I did have a sign with the instructions and measurements, as well as the formula for the chemical reaction, which included the formulas, molecular models, scientific names, and common names. You will need to test and possibly adjust amounts from those given, as it will vary depending on the size and shape of the cups used. The baking soda and vinegar react to produce bubbles of carbon dioxide, the same bubbles that are found in carbonated soft drinks (along with water and sodium acetate).

Bubbling confetti, new year's eve science

Materials:
  • plastic champagne flutes, 1 or 2 is enough, set of 2 from DollarTree, $1.25
  • baking soda
  • distilled vinegar
  • Gold flake confetti - 1 package, $7
  • trays to contain mess
  1. Place the champagne flute in the center of a tray.
  2. Put 1/4-1/2 teaspoon of baking soda in the champagne flute.
  3. Add 1/2 teaspoon of confetti.
  4. Pour in 1/8 cup (2 Tablespoons) of vinegar, all at once.
  5. Watch it bubble up, fizz and sparkle! (And possibly overflow.)
#7 - Countdown & Balloon Drop
I rigged up a balloon drop using a large cheap plastic tablecloth that I cut in half, then punched holes along the cut edges and threaded ribbon through the holes, leaving long ends hanging down to pull. I tucked the corners and a couple of points along the sides under the edges of the dropped-ceiling tiles, then filled with balloons.

I had a 30-second countdown video pulled up on the TV that I started as we approached noon, and then once we hit zero, the kids shot confetti and rattled their noisemakers, my assistant began blowing bubbles with a bubble gun, and I pulled the ribbon to drop the balloons. After the balloons were all down, I picked up a second bubble gun to add more bubbles, and started playing a New Year's Eve play list beginning with Auld Lang Syne. I forgot to take pictures of the balloon drop before or during, only thought to take one after.

How It Went 
It was a wonderful, chaotic mess, in the best way possible!

I had no idea what kind of turnout to aspect, as I haven't done a Noon Year's Eve party at this library before, and people were used to us not having anything going on during this week. Plus, all kinds of respiratory diseases are running rampant in our area right now: Covid, flu, RSV, and other unknown viruses. So I had the usual fear of either hardly anybody showing up, or way too many. But we had a perfect crowd of 55 kids and adults, who had so much fun! 

The biggest hit was the confetti poppers, which of course resulted in confetti everywhere! The kids loved it, and the adults were amazed that we didn't care about the mess. The fireworks painting was also a big hit, and also a big mess. By the end of the program, there were all kinds of confetti on the floor and on the tables, paint all over the table at that station, and a few balloons that people didn't take. Though it looked like a disaster, in all honesty it wasn't that hard to clean up. I know parents love the opportunity for their kids to engage in messy activities somewhere other than home, so I try to provide them as much as I can. Most of our programs are not this big or this messy, so we don't mind indulging every now and then.

The pictures below show some of the aftermath:


What I Would Do Differently
Really, the only things I would modify are (1) that we probably could do with one less station, and (2) the balloon drop. While the balloon drop worked, it didn't work as well as I'd have liked for a couple reasons. For one thing, one tablecloth really wasn't big enough to hold enough balloons, and I over-filled the first batch of balloons, so I ended up with only 36 balloons in the drop instead of 50. I should have kept them small in order to fit more of them in the drop. Also, between static electricity and being packed tightly, some of the balloons didn't fall and had to be knocked out with a broom. I will try to figure out a better method next year or invest in an actual balloon drop net, but we will do some type of balloon drop again. I'm also going to look into latex-free options next time. 

I had originally thought about serving cute mini-cupcakes with confetti sprinkles and water or juice, but ultimately decided against it, between having no idea how many people to expect and the amount of sickness going around. But next year I might re-consider now that I have a better idea of what kind of attendance to expect.

Friday, August 16, 2024

Play In the Sand Day! - Family Program


National Play in the Sand Day


I typically take a programming break in August to do a deep clean and organizing of the program room, plan for the upcoming school year, get in some training and professional development for me and my staff, and just to have a bit of a break after the busy summer, but this year I decided to throw in one special program to tide people over.

Since August 11th is National Play in the Sand Day and I already had play sand and kinetic sand, as well as a stack of sand art and a few sand bottle necklaces leftover from SRP 2022, I decided that it would be a relatively easy, low-cost, low-prep, and fun program to do. Though I initially hadn't planned on buying anything new for the program, I ended up getting a couple of small inflatable wading pools to use rather than the sensory bin (for ease of access by the little ones), another 100 pounds of play sand, and some great sand toys I happened to see on clearance.

Benefits: Sand play is not only fun, it offers several developmental benefits for kids:

  • Sensory Exploration - sand play allows kids to experience different textures, temperatures, dry vs wet, as well as movement, how their body interacts with the sand and space, developing tactile, vestibular, and proprioceptive senses.
  • Gross Motor Skills - scooping, digging, lifting buckets, using large molds all build muscle strength and eye-hand coordination.
  • Fine Motor Skills - using mini molds, spoons, collecting and arranging shells and rocks, sprinkling sand or water, using the pincer grasp all help develop and refine the smaller muscles and coordination of hands, fingers, and even toes.
  • Math & Science - scooping, molding and building with sand help develop concepts of volume, capacity, and numbers; sorting shells by size, color or type practices observation and classification skills; mixing sand and water encourages curiosity and experimentation.
  • Problem Solving - figuring out the right amount of moisture for the sand to be molded and keep its shape without collapsing or sticking, realizing building too close to the water means a short life for your castle, and trying to build bigger castles all require observation, testing, patience, and perseverance.
  • Creativity & Imagination - all open-ended play is wonderful for encouraging creativity and imagination, and sand play has endless possibilities. Build castles with molds or freeform, build something else entirely! Sculpt sand into animals, pretend to be a crab, a pirate, an explorer, a treasure hunter....
  • Social & Language Skills - as kids play near each other, they talk together, perhaps collaborate and work together, work out sharing and turn-taking, conflict resolution, and make new friends.
  • Boosts Immunity - Children who are allowed to play outdoors and get dirty have stronger immunity than those who do not.

Ages:
Offered as family program for all ages, attended by kids aged 1-10 & adult caregivers

Time: Drop-in program, 1-1/2 hour

Budget: $40, all items reusable, already had several items

Materials: 
  • Play sand, two 50 lb bags, Lowe's, $7.50 ea
  • Small inflatable wading pool, two, $14 ea, Amazon
  • Assorted sand toys & molds, already had some, bought a few more on clearance
  • Kinetic sand, already had
  • Adhesive sand art kits, leftover from SRP 2022
  • Sand bottle necklaces, leftover from SRP 2022
  • Assorted colored sand, already had
  • Assorted shells, already had
  • Cafeteria trays, already had
  • Mini funnels, already had
  • Dixie cups, smallest

Activities: 
  1. Sandbox - I filled each small wading pool with one 50lb bag of play sand, along with shells, various castle molds, animal molds, shovels, and other sand toys. Sand was already wet enough to mold; if not, add water.
  2. Kinetic Sand - Gave them a scoop (around a cup) of kinetic sand on tray, and provided mini castle and animal molds and shells.
  3. Adhesive Sand Art - These came as a kit, and kids just picked up the kit and a tray. Simply peel off the cover from all sections for a given color, sprinkle on the sand, spread, press in, and dump off excess. Repeat with each color until all sections are done.
  4. Mini Sand Bottle Necklaces - Dispensed colored sand in Dixie cups, set out funnels and bottles. Kids chose desired colors and using a funnel poured the sand in the bottles in layers. They did this on trays to contain the sand.
  5. Book Display - I put together a display with books featuring sand, sandcastles, going to the beach, seashells, seagulls, and sand crabs.
Play in the Sand Day, Benefits of sand play, sand art

How It Went:
This was a relatively low cost, low effort program, and a good way to make use of re-usable materials and supplies we already had and use up some leftover consumables. I had a good turnout, with about 18 kids of various ages and 12 adults. Considering we are in a small, rural town and school was back in session, this was a great turnout for an after school program. I also had a lot of good feedback, with several parents and grandparents thanking me for having it. They always like it when their kids can engage in messy play somewhere other than home!

I figured I'd be sweeping sand for the rest of the week, but it was surprisingly easier to clean up than I expected. We put everything away, wiped down tables and chairs then put chairs up on tables, scooped all the sand out of the pools into storage tubs, spot-swept the obvious areas of sand, then dry-mopped the whole floor. Finally, asked the custodian to wet-mop the floor that evening while the chairs were out of the way. I would be hesitant to do a program like this on a carpeted floor, but putting tarps down could help minimize the mess.

I would highly recommend doing a program like this, and I may make it an annual event. It has great developmental benefits, is inexpensive, easy, well-received, and a nice bonus program to throw in after summer reading to extend the summer fun just a little longer.

Further resources:

Friday, July 26, 2024

Beach Terrariums - Family Program


Beach terrarium

I was looking for a family craft that loosely fit the "Ocean Adventure" theme for our last week of summer reading, which had the overall CLSP theme of "Adventure Begins In Your Library", and somehow the idea of a beach-themed terrarium popped into my head, though it took me a little bit to figure out exactly how it was going to work.

Ages: Family, all-ages

Budget: About $3.75 per terrarium. This was one of my more pricey programs, but I also had some really inexpensive ones, so it evened out.

Time: This was one of the faster programs, taking only 40 minutes or so (which made up for my treasure hunt program the week before involving secret codes and hidden messages that ran WAY over, at an hour and a half!)

Materials:

  • terrariums - I got spherical plastic ones about 4" in diameter from DollarTree for $1.25 each, larger and cheaper than what I could find elsewhere, total of 34
  • air plants - $55 for 50 plants, Amazon (there are many different options available). I bought more than I needed because it would have been the almost the same price for fewer, and I figured some would die in transit (only 2 did), soaked in water for 30 minutes the day before the program
  • resin figures - packs of 3 for $1.25 at DollarTree, assorted (sandcastles, bucket of sand, coral, flip-flops, lighthouses, shells, starfish), 12 packs.
  • tiny shells & starfish - $12 on Amazon, came with 50 starfish and a jar of 800 shells
  • larger shells - these were from my personal collection from a long-ago vacation
  • sand - we already had play sand that I use for the sensory bin that I got from Lowe's for $5/50lbs
  • glue - from our stock supplies
  • craft sticks - from stock supplies
  • paper bowls - from stock supplies
  • small dixie cups - from stock supplies
  • measuring cup
  • forceps - left over from previous owl pellet dissection program
  • air plant care sheet
    (I ended up with about a dozen plants, 3 resin figures, about 12 starfish, and maybe 2-3 tablespoons of the tiny shells leftover)
How-To:
  1. I had them pick up the following supplies as they came in: terrarium, paper bowl, craft stick, forceps, dixie cup with 1/2-1 Tablespoon of small shells, and a few of the larger shells if they wanted. Glue and a small amount of dry sand were placed at each table.
  2. Next, I called them up a few tables at a time to get sand in their bowls, roughly 1/4 Cup.
  3. Add about 1/2 Tablespoon white glue to sand, and mix until it comes together, adding more glue if needed (this is to prevent the dumping of loose sand in the car or home; you could also use kinetic sand if you want to spend a lot more or have a small group).
  4. Press sand & glue mixture into bottom of terrarium, sprinkle just a little dry sand on top, and arrange shells as desired.
  5. While they were completing step 4 I went around and had them pick one resin figure out of a bowl without looking, to be fair, and they added the figures to their terrariums.
  6. Then they selected their air plants (there were a few different types) and added them to their terrarium, being careful to just set them on top of the sand, not pushing them into the sand.
  7. And for the final touch, I went around the room and gave everyone a tiny starfish to add.
Beach terrarium

How It Went:

This was a super popular program! So popular that I had to turn away 3-4 families due to all the terrariums being taken, which I really felt bad about, but I had purchased all I could find at all 3 stores in my area (not available online). I've never had this many show up for a craft program before! I had included "while supplies last, first come-first served" in my description (registration just doesn't work for us) and those I had to turn away at least seemed understanding. There was one other hiccup; UPS lost the package of air plants for several days, but they miraculously turned up the day before the program with only 2 dead out of 50 plants.

Other than that, it went really well, and those attending really seemed to like it. It was so popular, I will definitely do some other version of a terrarium program again in the future!

beach terrarium


Saturday, July 15, 2023

No-Sew Sock Animals - Family Craft Program


No-Sew sock animals


Last summer was my first SRP as the person in charge of planning the whole thing (and executing most of it), and though it was successful, I realized two things: (1) This community wanted and needed more family/all-ages programming, and (2) this did not include family movie days or family games days. So this year I added some family craft programs in addition to the big family events (paid performers, free mobile dairy classroom, and free truck event).

This "No-Sew Sock Animal" program was an easy, low-prep program, and turned out to be a huge hit with patrons. You only need a few supplies, and the only prep is to make a few examples, taking step-by-step photos, and putting together a sheet with step-by-step photos for participants to refer to (if you have time, include instructions, but I didn't, and no one had any trouble following just the photos).

Materials: 

  • Socks of various types, sizes, and patterns (I had fuzzy crew socks, brightly patterned knee socks, and some plain white crew socks I found, apparently leftover from some long-past program)
  • Polyfill stuffing (about 3 pillow-sized bags made about 50 animals) and/or rice (polyfill is cheaper & less messy)
  • elastic bands, rubber bands, twine, or yarn (I prefer the smaller elastic bands)
  • Sharpies or fabric markers (we used Sharpies)
  • Tacky craft glue (we used fabric glue, and it did NOT work)
  • Optional Embellishments: googly eyes, buttons, ribbon, yarn, pipe cleaners
  • Sheets with step-by-step photos for 3-4 animals

I selected 3 different animals to provide examples and directions for that were all pretty easy to do: caterpillar (easiest, no cutting), "soctopus" (moderately easy, only one section, but more cutting), and a rabbit (moderately easy, minimal cutting). You can find directions for several others, including bears and puppies, online that are a little more involved if you have an older audience. Though my program was technically for all ages, I knew with it being in the morning I would likely not get any teens. (I used the boring white crew socks for my examples in order to save the fuzzy and patterned socks for the kids.)

Caterpillar

No-Sew Sock Caterpillar

1. The patterned knee socks work really well for this one, though crew socks will also work. Pack the polyfill into the toe of the sock until it is as big as you want the head to be, making sure it is really packed and in a nice, round shape. Twist and tie off with elastic band or twine, making sure it is tight. 

2. Repeat, making each section slightly smaller than the one before, until you reach the end of the sock. 

3. If desired, twist a pipe-cleaner around the "neck" and shape into 'antennae'.

4. Use marker to add eyes and any other desired features, alternatively, glue on buttons or googly eyes.


Soctopus (yes, I included this just for the punny name 😉)

No-Sew sock animals, Soctopus

1. Pack polyfill into the toe of the sock, stretching the sock in order to make a large roundish head, and tie off. 

2. Trim off any excess length of sock if desired, then cut remining portion into eight tentacles.

3. Glue on (or draw) eyes, and draw any other facial features and details as desired.


Bunny

Unlike the caterpillar and soctopus, this one starts by making the bottom first and head last, and a crew sock works better than the longer knee socks for this one, IMO.

1. Fill the lower part of sock to make the desired size body (some preferred a round body, some preferred a slightly elongate body, and some desired a long body), then tie off. In order for the bunny to be able to sit upright, you will to at least partially fill the body first with rice for weight.

2. Fill the next section with polyfill to make a nice, rounded head and tie off.

3. Cut any excess length off the remaining portion (for ears that stand up, you will need to keep them shorter), then cut an elongated "v" shape from the center of the sock to form the two ears. Longer ears will be more floppy, and shorter ears more upright.

4. Pinch off a small portion and band/tie off to make the tail.

5. Add eyes and facial features as desired.

Optional: Pinch and tie off small pieces for paws. (I did not include this step, thinking best to keep it simple, but I saw several trying to glue on cotton balls or pom-poms to represent paw, and that didn't work well at all).


How It Went


I had a pretty big turnout for this program, 25 kids and 16 adults, and they all seemed to really enjoy it! They didn't have any trouble following the step-by-step photos, and got finished much faster than I expected. Since they were finishing so quickly and I had plenty of socks, I told them they could go ahead and make two if they wanted, and most did. There were a lot of cute animals made, lots of happy kids, and I got several compliments both at the end of the program, and later on social media when I posted pictures from the program. Our patrons rarely comment on our social media posts, so when they do take the time to leave a favorable comment about a program, you know it was a hit!

Note: the quality of sock does matter. I found that thicker socks are better in most cases, and in many cases smaller kids' socks would probably have worked better than the adult sized socks I purchased. Thick, fuzzy socks were the best choice for the bunnies, and the caterpillar is definitely the easiest and most forgiving design to make. 


Other Resources & Ideas

Sunday, June 11, 2023

Butter Making - Elementary STEM Program


Dairy Month


June is National Dairy Month, which I used for the theme of our first week of summer programs. For the big family event I had a
mobile dairy classroom come give a presentation on dairy nutrition and farm to table with a milking demonstration, along with a life-size fake cow simulator from our local extension office that the kids could try to milk. I also did dairy cow-themed storytimes and a book display with cow, dairy, and farm books.

For the elementary-aged program I decided to do butter-making, which is fun to do and I thought would appeal to our large homeschool population in particular. It would also be a program that any younger siblings tagging along could participate in. I've done this as a program once before, but this time I discovered a couple of tricks to make it go a little faster/easier (more on that below).

Saturday, May 6, 2023

Derby Day - Family Storytime


Kentucky Derby storytime, horse storytime


This was the last week of storytimes for the Spring, after which I would be taking a much needed break from programming for the rest of May. This is mostly to have more time to get ready for summer reading, but also because though I love doing storytime and other programs, I do get burned out on the planning of them and just need a break every so often. 

Sunday, September 25, 2022

When Programs Flop


It's something every programmer dreads, putting time and effort into what we think is a good program, and nobody shows up. But it's probably happened to all of us at least once, and it doesn't feel good. Though the word cloud above may be a bit harsh, it is definitely how I felt at the time when it happened to me. Like having no one show up to your birthday party, it's hard not to take it personally. And let's face it, as much as we say numbers aren't everything, we aren't naïve; we know numbers are how we are often judged.

Saturday, April 30, 2022

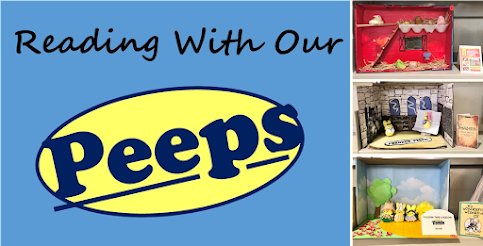
Reading with My Peeps - Diorama Contest


Over the last few years I had noticed a growing trend to make dioramas using Peeps. Love them or hate them, there is no denying the little sugar bombs are adorably cute, especially when portraying your favorite characters. Once I had seen them, I knew I wanted to host a library event some day, and this year I had my chance.

Saturday, April 16, 2022

Spring Break Programming


Spring Break at the library

Initially I wasn't planning on doing anything during Spring Break other than my usual storytime (which I had just resumed the week prior) and self-directed activities because I was told that everyone travels and it's always been dead at the library during spring break, and I *really* needed to work on planning summer reading. But, with high gas prices and all the problems with airline cancellations, I thought more people would be staying home than usual, and with the cold, wet weather expected most of the week they would need something to do.

So I decided to plan some very simple family programs that (1) would not cost a lot, (2) would not involve a lot of preparation, (3) would not involve a lot of staff time during the event, (4) most supplies purchased could be saved and reused, and (5) would work for a fairly large age-range; basically programs that could easily accommodate a crowd, but wouldn't be a waste of time and materials if no one showed up. Since it was also Library Week, I incorporated that theme in some of them. Here is what I came up with:

Monday, December 23, 2019

Mini 'Gingerbread' Houses II - Family STEAM Program


Mini Gingerbread house program, graham cracker houses

I did everything for the second round of building mini "gingerbread" houses pretty much the same as I did the first time, except that I raised the registration limit from 30 to 36. Since the first one went so smoothly I realized that I could easily accommodate that many, and since we always have no-shows I figured I needed to up it to 36 to get 30 anyway.


I've already written up all the details about materials needed, budget, etc., in my prior post, "Mini Gingerbread Houses", so I'll just quickly summarize here. Each session required about $75 in supplies for 30 houses, using graham crackers and canned icing. No pre-assembly was done, the only "glue" used was canned icing (no royal icing required, and most definitely no hot glue 😖), and no milk cartons or boxes). Participants were given brief instructions, tips for construction, and shown a few examples, then had the rest of the hour to free-build and decorate their houses.

Mini gingerbread house program for kids, graham cracker houses

While this session did go very well, there were some distinct differences from the first session. First of all, I ran into a LOT more broken graham crackers; in the first session I had maybe 2 crackers that were broken in the box, but there were at least 20 broken ones in the second session! I have no idea why, as they were the same brand, purchased from the same store at the same time, and stored in the same place. It was very frustrating and cost me several minutes of set-up time, but thankfully I had purchased an excess of crackers in case this happened. 

mini gingerbread house program for families, graham cracker houses

I also noticed the demographics of the crowd was quite a bit different from the first. In the first session I had mostly moms with younger kids in the 3-8 age range, but in the second I saw more older kids and teenagers, including two teens who came together rather than with family, a family who brought a couple of adult friends with them, and a mom that came by herself. So clearly this is an activity that appeals to all ages.

Mini gingerbread house program for kids, graham cracker houses

And finally, I noticed that in the second group I observed more people making up their own designs rather than building the typical square or rectangular house with a gabled roof. I saw one that looked something like a cross between art deco and Chichen Itza, one that resembled a pagoda, and one that reminded me of a house of cards, plus several with flat roofs.

Graham cracker structures STEM program

Everyone seemed to have a great time, and I didn't notice anyone getting frustrated. I got lots of compliments and "thank you"s, and some expressing the hope that we do it again next year (and I certainly hope to).

Gingerbread STEM program, graham cracker houses, mini gingerbread house program for kids,

So, long story short:
  • Get plenty of extra graham crackers in case of breakage.
  • Royal icing is NOT necessary (or recommended).
  • Gingerbread house building can be a STEAM activity
  • Pre-assembly and milk carton bases are unnecessary, and deprive participants of the opportunity to use their imagination, creativity, engineering, and problem-solving skills.
  • All ages enjoy making gingerbread houses, making it a perfect multi-generational program.
  • Must-have candies for decorating are mini candy canes, gum drops, starlight mints, and small candies like mini M&M's and/or Smarties. Cinnamon candies were not popular.

Gingerbread STEAM program, mini gingerbread house program, graham cracker houses for kids


Wednesday, December 4, 2019

Mini 'Gingerbread' Houses - Family STEM Program


Gingerbread houses for kids, graham cracker houses

Yes, building gingerbread houses can be a STEM program! It all depends on how you do it.

This is a program I have been wanting to do every since I started working at the library, and this year I was finally in a position where I could. I first started doing these mini-houses made from graham crackers with my daughter, so she could have her own to do while I worked on mine that I wanted to be "just so", or worked on creations for clients (this was back during my days as a semi-professional confectionery artist). 

Since I was doing this program as an expanded version of my monthly elementary STEM program, I was adamant about retaining as much creativity, engineering, and problem-solving as possible. That meant no pre-assembly, no pre-cutting, no forms or templates (i.e. milk cartons), and no dividing the candy up into exactly identical, individual portions. I wanted to encourage creativity, not cookie-cutter houses that all looked similar, and I had confidence in my participants' construction skills (with parental assistance). I also had enough experience making gingerbread houses to know it's really not as difficult as many fear, with the right materials.

Of course, I had to dress appropriately for the occasion:


Ages: This was advertised as an all-ages family program, but most participants were between the ages of 3 and 10, plus all the adults.

Time: 1 hour (plus 2-hours for set-up and 1 hour clean-up)

Number: 30 participants (registration was required & limited due to room size)

Budget: Approximately $75 (buying store brands on sale)

Materials:
  • 7 boxes graham crackers
  • 15-16 cans vanilla icing
  • 30+ disposable piping bags
  • 30+ rubber bands
  • 30+ 8" coated cake boards (if you use regular cardboard, you must cover with foil)
  • 30+ plastic knives
  • 30+ paper plates
  • short, wide plastic cups and/or bowls for putting candies and other decorations in
  • plastic spoons and/or tongs
  • assorted candies and other decorations
    I provided: mini candy canes, gumdrops, starlight mints, assorted other hard candies, cinnamon imperials (red-hots), mini M&Ms, Smarties, Teddy Grahams, and mini-twist pretzels. 
Prep:


1. I put together a short Power Point with basic instructions and tips with photos to go over at the beginning. Then I also made a slide show of assorted pictures of gingerbread houses, mostly mini-graham cracker houses, but also a few amazing gingerbread structures, like the Capitol building, a castle, St. Basil's cathedral, and of course, Hogwarts, to just have running on a continuous loop throughout the program for inspiration.

2. I pre-filled 30 piping bags with icing, cutting the tip off to make an appropriate opening and twisting and rubber banding the top closed (this makes it much easier for novices and
kids; I have found using zip-lock bags instead of pastry bags does not work as they rupture way too easily). (This took an hour alone, and was the most labor-intensive part.)

3. I had 6 tables set up with 5 places each, and at each place I set out a cake board, paper plate, plastic knife, filled piping bag, and 5 graham cracker sheets (4 sheets is enough for a basic house). Then I added 3 cans of icing (that were about half full after filling the piping bags) per table [to save time and not have to divide it up further, I figured families could share], and paper towels.

4. As a compromise between being sure everyone had enough of each candy and allowing creativity and individual variation (plus saving time), I divided each candy/decoration into six portions in cups or bowls and placed one of each on each table, rather than dividing into individual portions or putting it in one big buffet up front. For anything that was not individually wrapped, I included a spoon or tongs.

5. I put extra supplies on a table up front in case we had extra participants, people wanted to try to build a slightly bigger house, or needed more icing or crackers.

The Program:


1. I asked everyone to come in and have a seat, but to please not touch anything until everyone was settled and I had given them some instructions and tips.

2. The first thing I went over was practicing safe food handling since we were working in a group and sharing supplies. That meant no eating of the supplies during the program (plus we wanted to be sure there was enough of everything), no licking icing off the knives, and no licking of fingers. [I know it is not realistic to expect complete compliance, as the temptation is very strong, but it's never too early to learn proper kitchen hygiene and food handling].


3. Then I showed them a few samples of different houses and the basic process of construction: spread a thick layer of icing in the center of the cake board, pipe or spread icing along all the edges of the pieces to act as glue, press them together gently. 


4. One important tip is to use a gentle sawing motion with very little pressure when cutting the crackers to the shapes/sizes needed to avoid breakage! And just in general, to use a light touch when adding pieces or decorations to your house. After it's assembled, you can pipe a zig-zag over all the seams and raw edges to make it look more "finished".


5. And the biggest tip of all is to remember the point is to have fun, not make a perfect house! So don't worry if your house is crooked, cracked, or lopsided. Most mistakes can be hidden with icing and candy, and there are no building codes in gingerbread land!

How It Went

I admit I was a bit nervous, hoping I had not overestimated my participants' construction skills and patience, as this was the first time I had done this activity with a large group. But, it went so well!


I was absolutely amazed at how well everyone did! I was expecting to be run ragged, going back and forth helping frustrated children, but out of 27 kids there was really only one that had problems and got visibly frustrated. Most families worked really well together, with parents provided assistance and advice when needed. Some of the older kids worked pretty much independently, and as expected, the younger kids needed a bit more help. And as also expected, there are always a few parents that help perhaps a bit too much, but everyone was having a good time.


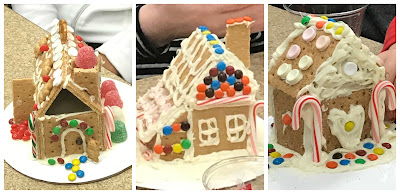
While most did follow the basic square house with a gabled roof like my example, some did build slightly larger, rectangular houses, other added creative additions and accessories, such as chimneys, Santa in the chimney, Santa's sleigh on the roof (creatively using candy canes for sleigh runners), trees, light posts, pathways, and dog houses. While all the houses were adorable, one child was particularly creative with his design, building a Frank Lloyd Wright-esque house, complete with a table set with candy plates on the upper terrace.

Gingerbread houses with kids, Frank Lloyd Wright gingerbread house

Everyone had a great time, and were very proud of their creations. There were lots of smiling faces and many compliments and thank you's, and since my assistance was not needed nearly as much as I had expected, I was able to spend more time chatting with families and admiring their houses. There were so many great houses I put all the pictures in slideshow so I could show them all:


And I get to do it all again on the 20th! Since I knew there would be a lot of interest, but the size of our room makes it necessary to cap it at 30, I offered two sessions for twice the fun!

Take Home Message

You can do a gingerbread house program without pre-assembling and doing everything for them! Free-building encourages creativity, problem-solving skills, patience, and a greater sense of accomplishment. In addition, using a piping bag increases hand strength and picking up and placing candy decorations uses fine-motor skills, both of which contribute to writing skills.

I've followed several different discussions about gingerbread house programs over the last few years, and I'll be honest, I was surprised at how many said they pre-assemble everything so all the kids have to do is stick their individually-portioned candy on them, some even saying they use hot glue (yikes, never a good idea to mix inedible with edible, especially when working with children). I'm sure people have their reasons for doing it this way, and perhaps have different goals that I do, but after having done a free-build family program, I wouldn't do it any other way.

Also, a note about icing. While royal icing is the traditional icing used for gingerbread houses, it is a PAIN to work with, especially for kids, and it completely unnecessary. Regular buttercream icing or store-bought icing in a can is so much easier to work with. It is thicker and stickier, and provides more support and holding power without having to wait for it to set. True, it does not dry quite as hard as royal icing, but it will easily last for a month. Royal icing is necessary for the big elaborate gingerbread masterpieces because they are so large, take weeks or even months to construct, and are meant to be kept on display indefinitely.