I did this fairly easy and relatively inexpensive STEAM program earlier this summer for ages 6-10, but some of the activities could be done with older or younger kids.
Materials:
- bubble solution (I really like the Joyin concentrate, especially if you ever use bubble machines)
- pipe cleaners
- straws
- skewers
- plastic dixie cups (do not use paper, the bubble solution goes right through them)
- small plastic plates
- plastic drink bottles with the bottoms cut off (doesn't matter what kind or size, or if they are all the same or not, though I wouldn't use ones with wider openings at the top)
- socks, or scrap pieces of fabric
- rubber bands
- food coloring
- paper
- bubble science kit (optional, but to me was worth the $10 to have a pre-made bubble cube and pyramid, and the booklet with suggested activities and other items came in handy as well); if you do not purchase the kit you would need to make your own bubble cube
Prep: At each table, I placed 4 pipe cleaners, 4 straws of different colors, 4 skewers, and 2 small plates (I didn't have enough for everyone to have their own). Then I filled the small plastic cups with bubble solution, to be passed out once everyone was settled and ready to begin the activities.
Activity #1 - Surface Tension, Elasticity, & Shape
- I instructed them to use a pipe cleaner to make a bubble wand with an angular opening, such as a square, triangle, star, or heart - anything but round - and see if they could blow a square, etc., bubble.
- After determining that they could only make spherical bubbles regardless of the wand shape, I showed a brief slideshow about the science of bubble. I conveniently happened up one on the American Chemical Society website, saving me from having to make a PowerPoint myself.
- This showed how the bubble wall is made up of a bilayer of soap molecules with their hydrophobic tails facing outward and their hydrophilic heads pointing inward, with water sandwiched in the middle. We also discussed surface tension, which is why the bubbles are always spherical; elasticity, which is why the bubbles can stretch and grow bigger; and how the iridescent colors are from light bouncing off the bubbles and bubbles not having a uniform thickness.

Activity #2 - Skewer Challenge
- I demonstrated how to use a straw to blow bubbles, and how to blow very gently to form a larger bubble that stays attached to the end of the straw, and let them practice until they got the hang of it.
- Then I showed them that I could pierce my bubble with a skewer without popping it (after dipping it in bubble solution without them seeing), then challenged them to do the same.
- Of course their bubbles all popped when pierced with a dry skewer.
- Then I let them in on the trick, and demonstrated how I had dipped my skewer in bubble solution first, which will allow the skewer to pierce the bubble without popping it, and even pass through to the other side.

Activity #3 - Bubble Clusters & Bubble Inception
- For this activity, I instructed them to pour some solution into the plate, then to blow bubbles using the straw onto the plate, and see what happens when bubbles connect. We observed that if the bubbles are very different in size, the larger bubble sometime absorbs the smaller one, making one larger bubble. But when bubbles are close to the same size, they attach, forming a wall in between. When many bubbles of similar size come in contact, the center one will end up in a hexagonal shape.
- Then we tried to see if we could blow one bubble onto the plate, and then blow more air into it to make it big enough to cover the entire center of the plate (we could).
- Next, we tried blowing a bubble inside of that bubble by dipping our straws in bubble solution, inserting it into the large bubble, then blowing. It was possible, but a little tricky keeping in the center so they wouldn't merge. Some of the kids were able to get one bubble inside, and I was able to go one more step and get a third bubble inside that bubble!
- We all played around trying different things before moving onto the next activity.

Activity #4 - Bubble Cube Demo
So, we already determined that bubbles are always spherical, right? Well, not exactly. They are always spherical when a single bubble is floating in air, but when they contact other surfaces, bubbles, or films, they do form straight walls.
Initially, my thought was to have them make their own bubble cube to do this trick, but after I spent the previous afternoon testing everything, I realized it would take too much time and likely be too difficult and frustrating for this age, and better suited for middle school and up, so I did it as a demonstration instead.
Initially, my thought was to have them make their own bubble cube to do this trick, but after I spent the previous afternoon testing everything, I realized it would take too much time and likely be too difficult and frustrating for this age, and better suited for middle school and up, so I did it as a demonstration instead.
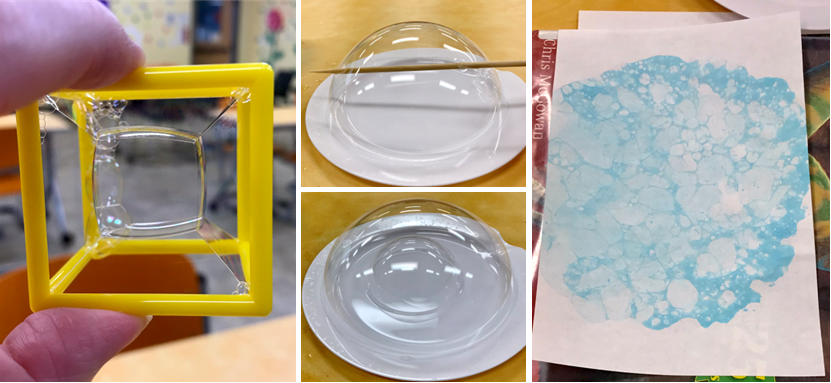
- Using the cube frame that came with the Bubble Science Kit, I dipped and rolled it in bubble solution until all 6 sides had soap films (or dunk it if you have a container of bubble solution deep enough).
- It would sometimes take a few tries, but I would carefully jiggle or tap the cube until I could get the films to join in the center.
- Using my straw dipped in bubble solution, I carefully blew a small bubble into the very center, resulting in a cube-shaped bubble! [Sometimes step 2 or even step 3 would happen spontaneously while rolling the cube in solution to coat.]

Activity #5 - Bubble Painting
Since you can't put bubble solution in paper bowls and I only had four plastic bowls, I set this one up as a station that they would take turns doing while others worked on the next activity, or continued to experiment with blowing bubbles. I put some solution into four bowls, and added a couple/few squirts of liquid food color into each [It took a fair amount, you'll just have to experiment until you get it right], and stirred to mix.
- First stir the solution well with your straw (the pigment tends to settle out).
- Put the end of your straw to the bottom of the bowl, and blow bubbles until there is a mound of bubbles above the top of the bowl.
- Carefully and slowly lower a piece of paper onto the bubbles, and continue lowering it until it almost touches the top of the bowl. Be sure to keep the paper taut and not let it sag in the middle or it will get down in the solution.
- Repeat with the same or multiple colors on different areas of your paper, if desired, then turn over and lay flat to dry (if the paper comes away with bubbles attached, it's fine; they will eventually pop).
- When dry, the colors are brighter and show up more, but if it's too light just add more color and try again. If the bubbles are popping too fast because the coloring has diluted the soap too much, simply add a spoonful or two of the concentrated bubble solution (or dish soap if making your own).

Activity #6 - Bubble Snakes!
- I gave each participant a (clean) plastic drink bottle that had the bottom cut off, a sock, and a rubber band.
- I showed them how to cut the excess top of the sock off if needed, then to put the sock on the bottle, covering the open bottom.
- Then we secured the socks in place with a rubber band.
- To test them, we went outside!
- I poured bubble solution in a deep tray, and they dipped the sock-covered ends of their blowers in the solution, letting it sit a few seconds to absorb the first time.
- Then blow into the bottle!
- This produces many tiny bubbles attached to each other, creating a column of foam (aka "Bubble Snake")
You could also do this using different types of fabric and comparing the results.

I gave them ziplock bags to take their bubble snake blowers and wands home in so as not to drip soap everywhere, a small tube of bubbles, and a sheet with three different bubble solution recipes to try at home (one with glycerin, one with corn syrup, and one with sugar) and a picture of the concentrated bubble solution I buy.
How It Went
I didn't get a huge turnout, likely because (1) our number always drop in July, and (2) I had done the very popular family craft "No-Sew Sock Animals" the day before that had a big turnout, but still a decent number. It was kind of nice to have just a dozen or so kids for a change, too, so it was less noisy and less hectic. Once we got going, they really started getting into it, and everyone loved the bubble snakes in particular! I had just the right number and combination of activities to fill the hour time slot. Now, to find a use for all the bottle bottoms I cut off!
There are several other bubble activities you could do, such as trying out different homemade bubble solutions, testing a variety of everyday objects as bubble wands/blowers (turkey baster, apple slicer, cookie cutters, colander, strainer, slotted spoons, etc), making giant bubbles, and more. I tried making an opening in a soap film using a circle of thread with the intention of doing it as a demo, but I couldn't get it to last long enough when I tested it [I could get it to work briefly, but the string would quickly fall out of the film; I think I needed a finer thread.], so I decided not to do it this time. It would be a good activity for older kids (12+). (Here's another cool variation of that trick: https://youtu.be/8sJ2tkCdqkg.)
Pictured below: The kids had a blast with their Bubble Snake blowers out on the patio, and I love this stair-step picture of some of them standing along the retaining wall (only about 1-2 feet high). There was just a slight breeze, which sometimes would blow their growing snakes away, but if they were standing in just the right direction, it would instead support their growing snakes, allowing them to grow to about 3 feet long!

Great post. We've done a number of bubble programs over the years. We'll have to add bubble snakes for next year. Depending on how deep they are those cut off bottle bottoms could work well for glue, paint or water for watercolors.
ReplyDeleteThese look like fun experiments ! We are always on the hunt for new STEM/STEAM Programs. Thanks !
ReplyDelete